LaserGlow Teeth Whitening Blogs & Oral Care Tips | Expert Advice


Best Tooth Gem Starter Kit in 2026: What You Actually Need (and What You Don’t)
Tooth Gems • Buyer Guide Best Tooth Gem Starter Kit in 2026: What You Actually Need (and What You Don’t) Most “starter kits” are either missing key steps or padded with filler. Here’s the clean checklist that actually leads to strong retention and premium-looking results. Quick take A real tooth gem starter kit needs proper prep + bonding (etch, bond, composite), an LED curing light, placement tools, and quality crystals. Everything else is optional. Prep + Bonding System LED Curing Light Placement Tools Premium Crystals Recommended starter bundle Want a no-guessing setup? This bundle includes LED curing, etch + bond + composite, essential tools, and Swarovski crystals. Swarovski Tooth Gem Starter Kit Bundle What a Real Tooth Gem Starter Kit Must Include 1) Proper tooth prep (non-negotiable) Tooth gems don’t reliably adhere to unprepared enamel. The foundation is a full prep + bonding system: etch, bond, and composite adhesive. Recommended component: Tooth Gem Kit (Etch + Bond + Glue) 2) LED curing light Reliable curing improves consistency and helps avoid weak holds. If a kit skips this, you’re either buying separately or settling. Recommended component: LED Curing Light 3) Accurate placement tools Clean placement is the difference between “premium” and “craft kit.” Wax tools help you place precisely. A removal tool helps you correct safely. Tools: Wax Applicator Tool | Removal Tool 4) High-quality crystals Premium crystals give clearer sparkle and consistent sizing, which makes placement easier and results more professional on camera. Crystals: Premium Crystal Tooth Gems Want the simple option? Get the complete setup in one: Swarovski Tooth Gem Starter Kit Bundle (LED curing + etch/bond/composite + tools + Swarovski crystals + FREE Tooth Gem Guide) What You Don’t Need (Despite What Some Kits Claim) You can safely ignore filler that doesn’t improve retention or placement: • 200+ random crystals you’ll never use • mystery adhesives with inconsistent results • oversized shape assortments for beginners • extra accessories that don’t affect bonding or curing Learn Before You Apply Step-by-step education: Tooth Gem How-To Guide Tooth gem hub: Tooth Gem Resource Center FAQ What’s the most important thing in a tooth gem starter kit? A complete prep and bonding system (etch, bond, composite) and an LED curing light are the foundation. Tools and crystal quality then determine how clean the final result looks. Do I need an LED curing light for tooth gems? If you want consistent curing and better retention, yes. An LED curing light makes the bonding process faster and more predictable. Is it better to buy a bundle or individual components? If you already have tools, components can make sense. If you’re starting from scratch, a bundle saves time, reduces guesswork, and usually costs less than buying everything separately.
Learn moreTeeth Whitening Equipment Checklist for Business Owners (Complete Setup)
This equipment checklist is a companion to our full guide: How to Start a Teeth Whitening Business in 2026. If you searched “teeth whitening equipment checklist for business,” you want a clean list you can follow without buying random stuff you don’t need. Quick Checklist Core Equipment Gels + Strengths Client Supplies All-in-One Kit FAQ Quick Answer: Teeth Whitening Equipment Checklist Featured snippet format Complete beginner checklist Professional LED teeth whitening machine LED curing light Gingival barrier (gum protection) Professional whitening gels (multiple strengths) Shade guide + protective goggles Cheek retractors + disposables Consent + aftercare instructions Shortcut option Want everything in one purchase? Professional Teeth Whitening Business Starter Kit. Includes a free $400-value PDF guide: Free PDF Guide. Core Equipment The foundation of your service Your “core equipment” is what makes your sessions consistent and professional. Start here before you buy add-ons. Professional LED Whitening Machine This is the centerpiece of your service and what clients expect to see. Link: LED Teeth Whitening Machine. LED Curing Light Cures the gingival barrier quickly so sessions run clean and efficient. Link: LED Curing Light. Gingival Barrier (Gum Protector) Protects gums during whitening and helps keep gel where it belongs. Link: Gingival Barrier. Documentation + Safety Shade tracking and eye protection make your service feel professional and trustworthy. Links: Shade Guide, Whitening Goggles. Professional Gels + Strengths Tailor sessions, don’t guess Beginners mess up by using one strength for everyone. Clients vary. Having multiple strengths lets you adapt, set expectations, and keep sessions smoother. For education on gels and best practices, start here: Professional Resource Center. Common professional strengths (direct links) 16% Hydrogen Peroxide Gel25% Hydrogen Peroxide Gel35% Hydrogen Peroxide Gel44% Dual Barrel Hydrogen Peroxide Gel Maintenance add-on (easy revenue) Offer a maintenance pen for between visits: 44% Carbamide Peroxide Teeth Whitening Pen. Client Supplies The “professional experience” pieces These are the items that make your service look clean, consistent, and trustworthy. They also make your before/after results easier to document and share (marketing). Cheek retractors: keeps lips/cheeks out of the way for clean gel placement. Shade guide: documents results so clients can see change. Goggles: safety + professionalism. Disposables + aftercare: reduces complaints and increases repeat business. Links: Soft Cheek Retractors, Shade Guide, Whitening Goggles. All-in-One Kit Option Fastest way to launch If you want the full setup without piecing it together, the complete bundle is here: Professional Teeth Whitening Business Starter Kit. Included learning Free $400-value PDF guide: Professional Teeth Whitening Guide (Free PDF). If you want structured training: Online Course. Educational content only. Always follow local regulations and professional guidelines in your area. FAQ Common equipment questions What equipment do I need to start a teeth whitening business? A professional LED whitening machine, curing light, gingival barrier (gum protection), multiple gel strengths, shade guide, goggles, retractors, disposables, and clear aftercare. Do I need a curing light? If you’re using gingival barrier, a curing light makes sessions faster and cleaner by curing the barrier quickly. Do I need multiple gel strengths? Yes. Clients vary. Multiple strengths help you tailor sessions and manage expectations. Full guide: How to Start a Teeth Whitening Business (2026) · Starter kit: Professional Starter Kit
Learn more
Teeth Whitening Business Startup Cost (2026): Real Budget Breakdown
This is the cost-focused companion to our full guide: How to Start a Teeth Whitening Business in 2026. If you’re here because you searched “teeth whitening business startup cost,” you’re usually trying to avoid two things: overspending and buying the wrong stuff. Quick Budget Answer Cost Breakdown What NOT to Buy First Starter Kit Shortcut FAQ Quick Answer: What should I budget first? Featured snippet format Minimum budget priorities Budget for your core equipment and safety first: a professional LED whitening machine, curing light, gingival barrier (gum protection), then professional gels and client disposables. Add “extras” only after you’ve run consistent sessions. Fastest path (one purchase) If you want an all-in-one setup instead of sourcing everything separately, see: Professional Teeth Whitening Business Starter Kit. It also includes a free $400-value PDF guide: Free PDF Guide. Startup Cost Breakdown (Simple + Realistic) What to budget for A clean way to budget is splitting costs into two buckets: one-time equipment and per-client consumables. Most beginners overspend because they buy “extras” before they build a repeatable session flow. 1) One-time equipment (your foundation) Professional LED whitening machine: your core tool and the centerpiece of your service. Curing light: cures the gingival barrier quickly so sessions run clean and efficient. Documentation + safety tools: shade guide and goggles build trust and professionalism. Direct links: LED Teeth Whitening Machine, LED Curing Light, Shade Guide, Whitening Goggles. 2) Per-client consumables (this scales with volume) Gingival barrier: gum protection for cleaner sessions. Professional gels: multiple strengths so you’re not forcing every client into the same approach. Retractors + disposables: consistent client-ready sessions. Aftercare: reduces complaints and improves retention. Consumable links: Gingival Barrier, 16% Gel, 25% Gel, 35% Gel, 44% Dual-Barrel Gel, Cheek Retractors. Rule of thumb If your setup supports your first 20–30 clients without scrambling for supplies, you’ve budgeted correctly. If you’re reordering before you’ve even sold sessions, your buying order was wrong. What NOT to Buy First Common overspending traps The most common startup cost mistake is buying a pile of “nice-to-have” items before you can run a clean, consistent session. Here’s what to avoid until you have steady demand. Buying multiple machines before you’ve proven volume Stocking too many add-ons without a clear pricing ladder Skipping shade documentation then wondering why clients “don’t see” results Skipping gum protection (this is not where you cut corners) Adding too many packages and confusing people into doing nothing Want the cleanest beginner blueprint? Use the free PDF guide (built by licensed professionals): Professional Teeth Whitening Guide (Free PDF) and the learning hub: Resource Center. Starter Kit Shortcut (One Purchase Setup) Save time + avoid missed items If your goal is to start quickly without missing key items, a complete kit is the easiest path. LaserGlow’s bundle is here: Professional Teeth Whitening Business Starter Kit. What this solves No guessing which supplies you forgot No buying duplicates from multiple vendors Cleaner, faster setup to start booking clients If you want structured training beyond the included guide, the course is here: Online Teeth Whitening Course. Educational content only. Always follow local regulations and professional guidelines in your area. FAQ High-intent searches How much does it cost to start a teeth whitening business? It depends on your business model and equipment quality. A practical framework is: one-time equipment costs (machine + curing light + documentation tools) plus per-client consumables (gels, gingival barrier, disposables). Start with essentials first, then expand. What should I buy first? Buy the core equipment and safety first (LED machine, curing light, gingival barrier), then gels and client disposables. Avoid “extras” until you’re running consistent sessions. Is it cheaper to buy supplies separately or buy a kit? Buying separately can work, but beginners often miss items or overbuy duplicates. A complete kit reduces guesswork and speeds up launch. Read the full guide: How to Start a Teeth Whitening Business (2026) · Starter kit: Professional Starter Kit
Learn more
How to Start a Teeth Whitening Business in 2026 (Costs, Equipment & Starter Kit Checklist)
A practical guide to launching a teeth whitening service: what to buy, what it costs, how to price, and how to avoid rookie mistakes.
Learn more
Tommy DeVito x LaserGlow: Inside His In-Office Teeth Whitening Visit in Clifton, NJ
NFL Athlete Visit • Clifton, NJ Tommy DeVito x LaserGlow: The Story Behind His Perfect White Smile Tommy DeVito visited LaserGlow in Clifton, NJ for a professional in-office teeth whitening treatment — then filmed a promo showing the at-home routine that helps keep his smile camera-ready: our Wireless LED Kit, Purple Toothpaste, and PAP+ Powder. Book Clifton Whitening Shop His Routine Watch the Tommy DeVito x LaserGlow promo ↓ In 2025, the camera is always on. Between interviews, press conferences, social clips, and high-definition broadcast close-ups, a public figure’s smile becomes part of their identity. And if you’ve seen Tommy DeVito on screen, you already know the “signature look”: confident, polished, and a smile that stays bright in any lighting. Tommy’s teeth are known for being clean and naturally white — not that artificial, overdone shade. That kind of “perfect white teeth” look isn’t luck. It’s the result of professional-level consistency: the right foundation done in-office, and the right at-home routine to keep it there. Who Is Tommy DeVito? A Quick Football Snapshot Tommy DeVito is a New Jersey-born quarterback who rose through competitive high school football, developed through college football (including time at Syracuse and Illinois), and then made the jump to the NFL. His story is all about staying ready — and when opportunity shows up, performing under pressure. Many fans first learned the name when he played for the New York Giants, stepping into the spotlight and proving he could handle the moment. And as of 2025, Tommy continued his professional career with the New England Patriots after being claimed off waivers in late August 2025. Tommy DeVito’s In-Office Teeth Whitening Visit in Clifton, NJ Tommy came to LaserGlow for teeth whitening in Clifton, NJ because in-office whitening creates the foundation: even brightness, cleaner tone, and results that look great immediately — in person and on camera. The reason in-office whitening hits different is precision. Professional whitening is designed to lift stains evenly, reduce patchiness, and help deliver a bright result that still looks natural. It’s the kind of smile upgrade you notice right away — not “fake-white,” just fresh, clean, and elevated. For athletes and public figures, this matters. Stadium lights, studio lights, and phone-camera flash can exaggerate yellow tones and uneven color. In-office whitening helps create a more uniform look — the exact kind of “camera-ready” smile that’s become part of Tommy’s brand. Want the same Clifton treatment? Book here: in-office teeth whitening in Clifton, NJ. If you’re building toward a major event (wedding, photos, interviews, business content, or just a personal glow-up), starting in-office is the fastest way to set the baseline. Why the Tommy DeVito x LaserGlow Collaboration Is Creating Buzz Collaborations get attention when they feel real. Tommy didn’t just “pose with a product.” He came in, got treated, and we filmed content that shows how an actual routine works: professional whitening first, then daily maintenance to keep teeth looking bright. That’s exactly why this collaboration is powerful for people searching online for: Tommy DeVito teeth, Tommy DeVito white teeth, celebrity teeth whitening NJ, teeth whitening Clifton NJ, and best teeth whitening near me. The story connects celebrity-level results to a real place people can book. It also highlights something most “celebrity smile” articles skip: the maintenance. The truth is, whitening results don’t stay perfect by accident. They stay perfect because of habits — and a system you can actually follow. The Promo Video: Tommy’s At-Home Routine for a Camera-Ready Smile After his visit, we filmed a promo showing the products Tommy uses to maintain that signature brightness. This is the part people love because it’s simple — and repeatable. If you want the “always looks white” effect, you need tools that work together. The routine featured in the video focuses on three key pieces: a targeted LED whitening step, a color-correcting toothpaste for day-to-day brightness, and a gentle stain-lifting powder that fits into a consistent schedule. Shop Tommy DeVito’s Whitening Routine Wireless LED Teeth Whitening Kit The at-home step featured in the promo. Ideal for maintaining a bright smile between office visits and keeping your results looking even and fresh. View the Wireless LED Kit → Purple Teeth Whitening Color Corrector Toothpaste The “looks white instantly” move. Purple pigment visually neutralizes yellow tones so teeth appear brighter after brushing — especially helpful for photos and harsh lighting. View Purple Toothpaste → PAP+ Teeth Whitening Powder A gentle whitening step designed to help lift surface stains as part of a consistent routine. Perfect for people who want a brighter smile without making their routine complicated. View PAP+ Powder → How to Get the “Tommy DeVito White Teeth” Look If you’re trying to copy the vibe — the clean, bright, confident smile that holds up in any lighting — here’s the simplest framework: start with a professional foundation, then maintain it at home. Step one is booking laser teeth whitening in Clifton. This establishes your baseline. Then your at-home routine keeps the shade from drifting. People who get the best long-term results treat whitening like grooming: consistent, not chaotic. You don’t need to do the most — you need to do the right things, regularly. Ready to book the Clifton whitening experience? If you want a brighter smile that looks natural and photographs beautifully, start with an in-office session and maintain it with Tommy’s featured routine. Book Teeth Whitening in Clifton, NJ → FAQs Where can I book teeth whitening in Clifton, NJ? Book here: teeth whitening in Clifton, NJ. What happens during an in-office teeth whitening session? In-office whitening typically includes an assessment, professional whitening application, and guidance on how to maintain your results at home for longer-lasting brightness. How do I maintain whitening results at home? Consistency matters. Pair an LED teeth whitening kit with daily brightness support like purple color-correcting toothpaste and a gentle routine step like PAP+ whitening powder. What does purple toothpaste do? Purple toothpaste uses color correction to visually neutralize yellow tones, helping teeth appear brighter right after brushing (especially in photos and harsh lighting). What is PAP+ teeth whitening powder? PAP+ powder is designed as a gentle stain-lifting step that fits into a consistent routine. It’s a great option for people who want day-to-day maintenance without overdoing it. © LaserGlow. Availability and results may vary. Always follow product directions and professional guidance.
Learn more
Tooth Gem Removal Risks & Safe Options | LaserGlow
Lifestyle Advice Before you try anything at home, learn what not to do, when to see a pro, the typical costs, and simple aftercare tips. Then, if you want the clinical protocol, jump to our professional guide. Quick links: Why People Remove Gems What Not to Do When to See a Pro Removal Cost Aftercare Tooth gems are fun, creative, and expressive — but what happens when you’re ready to take them off? Whether it’s the end of a trend, a job change, or you’re simply switching designs, knowing how to remove a tooth gem safely can save your enamel. Bottom line: avoid DIY hacks. If you want the professional, step-by-step technique, see our Tooth Gem Removal Guide (clinical protocol used by pros). 💎 Why People Remove Tooth Gems Switching to a new crystal or shaped design Adhesive has started to loosen over time Work or professional requirements Just ready for a fresh look Curious about wear time and retention? Read How Long Do Tooth Gems Last? 🛑 What Not to Do at Home We’ve seen it all on social — tweezers, glue removers, nail files. These can chip enamel or leave rough surfaces that collect plaque. Never pry or yank with force Avoid acetone or harsh solvents Don’t grind or sand the gem yourself Risk reminder: DIY methods may cause micro-scratches that are hard to polish out later. ⭐ When to See a Professional Licensed providers can safely lift the gem and polish away the bonding resin without harming enamel. No drilling, no pain, no acids — just a clean, smooth finish. Want the exact clinical steps (evaluation → edge lift → adhesive clean-up → polish)? View the Professional Removal Guide → 💰 How Much Does Professional Removal Cost? On average, removal costs between $50–$150 depending on provider and location. Many offices (including ours) can reapply a new gem in the same visit. Budgeting your sparkle? See Tooth Gem Cost in 2025. 🩵 Aftercare Once a Gem Is Removed Brush and floss gently for 24 hours If enamel feels rough, ask for a quick polish Wait ~1 week before applying a new gem Want more expert tips on aftercare, longevity, and styles? Explore the Tooth Gem Resource Hub → ✨ Final Thought Tooth gems should be as easy to remove as they are to love — just keep enamel health first. Leave removal to professionals and you’ll be ready for your next look, damage-free.
Learn more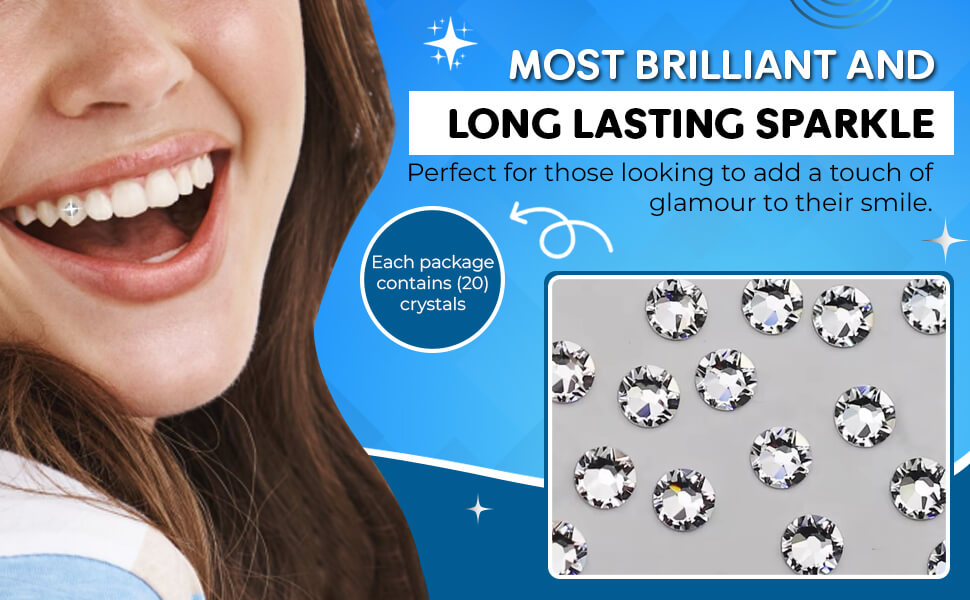
How Much Do Tooth Gems Cost in 2025? Price Trends & Tips | LaserGlow
2025 Price Trends From subtle single crystals to bold designer shapes, here’s what you can expect to spend on tooth gems this year — plus a few insider tips for getting the best value and keeping your sparkle longer. Tooth gems are no longer just a celebrity trend — they’ve become a staple in self-expression and smile styling. But if you’re new to the look, one question always comes up: how much do they cost? Let’s break down the numbers, the factors that affect them, and how to make sure your investment lasts as long (and shines as bright) as possible. For a complete overview — including safety, removal, and longevity — check our Professional Tooth Gem Pricing Guide. 💰 Average Tooth Gem Pricing Single Crystal Placement: $50–$150 Custom Multi-Gem Designs: $150–$500 Gold, Heart, or Butterfly Shapes: $200–$1000+ DIY Kits: $20–$60 (short-term use) Most professional placements include a quick consult, design selection, and aftercare guidance. Prices rise with gem quality, design detail, and technician expertise. 📊 What Affects Tooth Gem Cost? Gem Type: Swarovski, gold, or diamonds each have different base costs. Design Complexity: Single crystals vs. clusters or logos. Technician Skill: Licensed hygienists or trained techs charge slightly more but ensure enamel-safe results. City & Studio Location: Major metro areas often price higher. Longevity: Premium adhesives and curing lights add to the cost but extend wear time. See the science behind longer wear in our Tooth Gem Longevity Guide. ⚖️ Professional vs DIY — Which Is Worth It? While DIY kits seem cheaper, they rarely match the durability or enamel protection of professional bonding. A certified tech uses dental-grade etch, bond, and LED curing for precise adhesion. Professional: Lasts 3–12 months+, enamel-safe, polished finish. DIY: Quick fix for photoshoots, lower retention, higher risk of fall-off. Want a complete set of professional tools and adhesives? Shop Tooth Gem Kits & Supplies → 💎 Are Tooth Gems Worth the Price? Absolutely — when applied correctly, they’re a safe, semi-permanent way to elevate your smile. Like any aesthetic service, the key is quality materials and expert technique. Most clients say the confidence boost alone makes it worthwhile. When you’re ready to switch styles or remove it, a quick polish by a professional keeps your enamel flawless. Need removal advice? Read our Tooth Gem Removal Guide. ✨ Final Thoughts In 2025, expect to spend around $50–$250 for single-gem applications — and more for designer or gold options. Choose licensed providers, ask about enamel-safe bonding materials, and follow proper aftercare to keep your gem looking bright for months. For professional tips, bonding protocols, and full safety insights, visit the LaserGlow Tooth Gem Resource Hub. Reviewed by David Hanna, RDH – Licensed Dental Hygienist, 10+ years’ experience in cosmetic and preventive dental care.
Learn more
Are Tooth Gems Bad for Your Teeth? What Pros Recommend | LaserGlow
Real-World Guidance Short answer: tooth gems can be enamel-safe when applied with professional materials and removed correctly. The real risks come from low-quality adhesives, untrained application, and DIY removal. Use this myth-busting guide to decide confidently—then see our clinical Aftercare & Safety page for the technical details. Reviewed by David Hanna, RDH Think of tooth gems like semi-permanent jewelry for your smile. Done well, they’re temporary, non-invasive, and confidence-boosting. Done poorly, they can irritate gums, trap plaque, or scratch enamel. Below, we separate myths from facts, give you a quick safety checklist, and flag situations where you should wait. Need the clinical protocol, hygiene steps, and enamel-safe do’s & don’ts? Read our Professional Aftercare & Safety Guide (evergreen resource hub). 🔎 Myth vs Fact Myth: “Tooth gems drill into your teeth.” Fact: Proper application is non-invasive—no drilling on sound enamel. A dental-grade resin bonds the gem to the surface and can be polished off professionally. Myth: “They ruin enamel.” Fact: Enamel issues usually trace to wrong adhesives or DIY removal. With pro materials and correct removal, your enamel should remain smooth and intact. Myth: “You can use nail glue—it’s the same.” Fact: Household glues can irritate gums and stain enamel. Only use products intended for teeth and applied by trained providers. Myth: “Brushing will knock it off.” Fact: With a proper bond and curing, normal brushing is fine. Focus on gentle passes around edges and keep flossing as usual. ✅ Safety Decision Checklist (2 Minutes) Provider: Are they trained or licensed? Do they explain etch/bond/LED curing and aftercare? Materials: Are the gems and adhesives designed for teeth (not craft gems or nail glue)? Placement: Is the location low-stress (not biting edges) and free of cracks or existing restorations? Hygiene Plan: Do you understand brushing, flossing, and what to avoid in the first 24 hours? Exit Plan: Do they offer professional removal and polish when you’re ready? Want pro-level longevity tips instead of DIY hacks? See our Longevity & Maintenance Guide. 🛑 Who Should Wait (and Red Flags) Active cavities, untreated gum disease, or cracked teeth—fix these first. New orthodontic attachments or recent whitening (wait for sensitivity to subside). High-contact sports without a mouthguard. Any provider who can’t name their adhesive system or offers to use “super glue.” Red flag: Pain, ongoing sensitivity, or a rough edge catching floss—schedule a professional evaluation and polish. 🧠 What Professionals Emphasize Dental professionals are generally cautious about unregulated adhesives and DIY removal—not about the concept of tooth gems themselves. The consensus: use dental-intended materials, follow proper bonding steps, and rely on professional removal. Want the enamel-safe routine and post-care steps? Open the Aftercare & Safety Guide → 🩵 Safer Choices Start with Better Materials If you’re shopping, choose gems and kits intended for teeth—never craft crystals or household glues. Premium Crystal Tooth Gems — brilliant clarity designed for smiles Tooth Gem Kit (Etch • Bond • Adhesive) — professional-grade system Removal Tool (Pro) — for trained providers only ✨ Bottom Line Tooth gems can be safe for enamel when you choose a trained provider, dental-intended materials, and proper aftercare. Skip shortcuts, book professional removal, and you’ll enjoy the sparkle—minus the stress. Reviewed by David Hanna, RDH – Licensed Dental Hygienist.
Learn more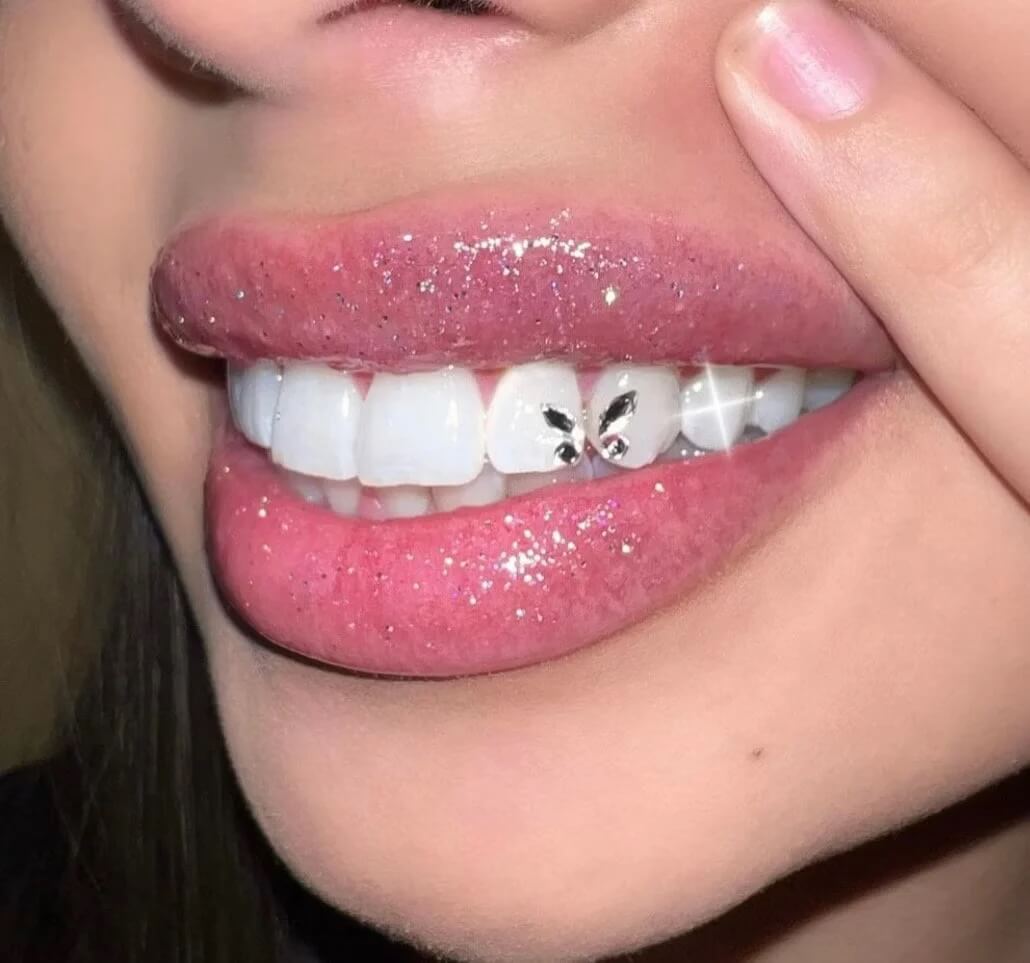
How Long Do Tooth Gems Really Last? Real-World Timelines & Tips | LaserGlow
Real Timelines A practical look at everyday wear: real-world timelines, habits that help or hurt retention, and a simple 3-step plan to get the most months out of your sparkle. For clinical bonding science, see our professional Longevity guide. Reviewed by David Hanna, RDH Most clients ask this first: “Will it stay for my vacation? For the semester?” The truth is that longevity isn’t a single number—it’s a mix of materials, placement, and your daily habits. Want the technical protocol (surface prep, cure times, edge sealing)? Read the Professional Longevity & Maintenance Guide in our Resource Hub. 📅 Real-World Longevity Snapshots Scenario Typical Wear Time Notes Single crystal, professional bond 6–12+ months Best-case if placed away from biting edges and cured thoroughly. Shaped gem (heart/butterfly) 4–10 months More edge area; gentle brushing around contours helps. DIY kit (home application) 3–6 months Shorter retention from simplified prep and curing. High-stress placement (biting edge) 1–4 months Chewing forces and micro-chipping shorten lifespan. 🧠 Habits That Help (and Hurt) Retention Helps Soft-bristle brushing around edges (not across the gem) Avoiding hard biting on the gem for 24–48 hours Rinsing after sticky or acidic snacks Nightguard if you grind/clench Hurts Chewing ice, biting nails, or opening packages with teeth Constant tongue/finger picking at the gem Skipping polish if the edge feels rough Applying over cracked enamel or old bonding Worried about safety instead? Read our lifestyle explainer: Are Tooth Gems Safe? ✅ 3-Step Plan to Make It Last Longer Choose placement wisely: Ask for a low-stress spot away from biting edges. Protect day 1: Avoid hard bites and hot/sticky foods for 24–48 hours. Maintain edges: If it ever feels “catchy,” book a quick polish—don’t pick. Want pro-level tips (cure times, edge seal, moisture control)? Open the Professional Longevity Guide → 🩵 If Your Gem Falls Off Don’t panic—properly applied gems usually leave enamel intact. If you feel roughness or sensitivity, schedule a quick polish. Ready for a refresh? Reapply with a fresh kit or book a professional for maximal wear. Thinking about a change? See our Tooth Gem Removal Guide. 💎 Materials Matter Longevity starts with quality gems and adhesives designed for tooth surfaces—never craft crystals or household glues. Premium Crystal Tooth Gems — clarity and cut for smiles Tooth Gem Kit (Etch • Bond • Adhesive) — professional-grade system LED Curing Light — consistent cure for stronger bonds ✨ Bottom Line Expect 3–12 months in most cases—longer with smart placement, quality materials, and simple care. Treat your gem like semi-permanent jewelry: protect it on day one, avoid stress habits, and let a pro handle polish or removal. Reviewed by David Hanna, RDH – Licensed Dental Hygienist.
Learn more


