Tooth Gems 101: The Ultimate Guide to Dazzling Teeth Gems for a Sparkling Smile
Sparkle up your smile! Tooth gems – sometimes called teeth gems or dental jewelry – are the latest fashion-forward way to add personality to your grin. These tiny rhinestones and crystals applied to teeth have surged in popularity, appearing in celebrity smiles and social media feeds. If you’re curious about tooth gems and how they can give you a glamorous, confident smile (and even how to apply them yourself!), you’ve come to the right place. In this comprehensive guide, we’ll cover everything from what tooth gems are and why they’re trending, to how to apply and remove them safely at home, all while highlighting the premium products (like wax applicators and gem removal tools) that make the process easy and safe. Let’s dive in and get your smile shining!
What Are Tooth Gems?
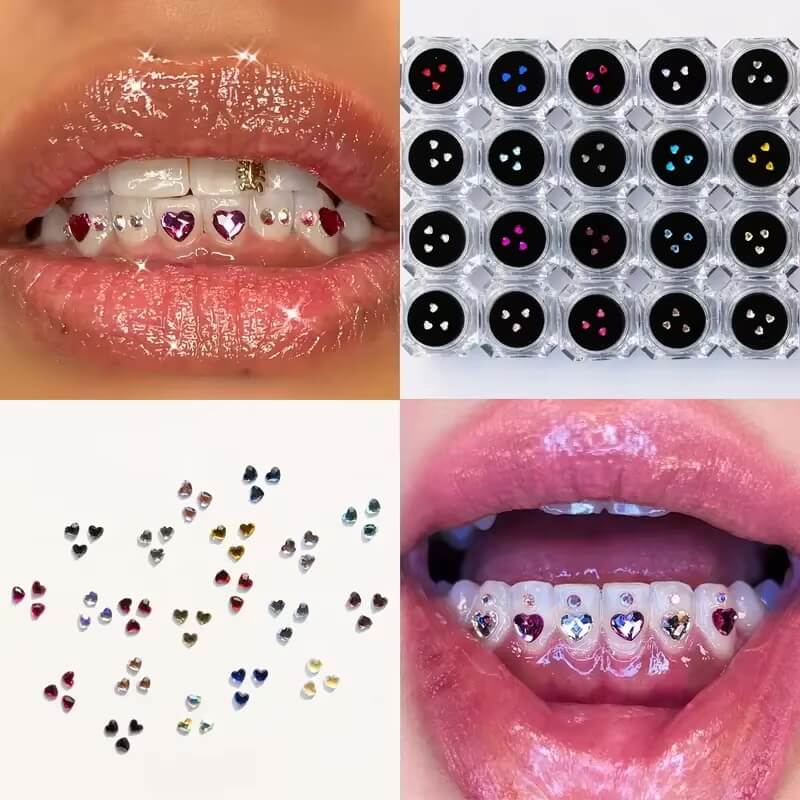
Tooth gems are small decorative jewels – often crystals (like Swarovski® crystals), gems, or metallic charms – that are bonded to the surface of a tooth as a cosmetic enhancement. In simpler terms, they’re like little sparkly stickers for your teeth, except they’re secured with a special dental adhesive rather than any ordinary glue. These gems come in various shapes, sizes, and colors, allowing for personalization of your smile. For example, you might choose a single clear crystal for a subtle sparkle or opt for fun shapes like tiny butterflies or hearts for a bolder statement.
Key characteristics of tooth gems:
- Non-invasive & Temporary: Applying a tooth gem does not require any drilling or permanent alteration of your tooth. The gem is bonded on the surface with a dental-grade adhesive and can be removed later without damage. It’s a purely cosmetic addition, much like wearing jewelry.
- Materials: High-quality tooth gems are typically made from lead-free crystals (e.g. Swarovski crystals), real diamonds, or gold charms. Using premium materials ensures they shine brilliantly and won’t tarnish. (Cheaper plastic rhinestones exist, but they won’t have the same sparkle or safety for dental use.)
- Application method: A tooth gem is usually attached using a process similar to orthodontic brackets. The tooth is conditioned, a bonding agent (dental composite glue) is applied, and the gem is set in place and cured (hardened) with a special light. This strong bonding technique (comparable to how braces attach to teeth) ensures the gem stays on for months.
In essence, a tooth gem is a tiny piece of temporary bling for your teeth, letting you express your style every time you smile. They’re sometimes also referred to as “tooth crystals,” “teeth jewelry,” or “dental gems,” but all those terms describe the same fun accessory.
Why Tooth Gems Are the Latest Trend
Decorating one’s teeth is not entirely new – in fact, it dates back centuries. Dental jewelry has a rich history, going back to ancient civilizations like the Mayans who would adorn their teeth with jade or gold inlays. Today’s tooth gem trend is a modern twist on this idea, and it’s skyrocketed in popularity thanks to celebrities and social media:
- Celebrity Sparkle: A-list stars and fashion icons have been spotted with tooth gems, fueling the craze. For instance, celebrities like Katy Perry and Hailey Bieber have showcased dazzling tooth jewelry on the red carpet, inspiring fans to try the look themselves. When your favorite singer or influencer flashes a glint on their tooth in an Instagram post or music video, it quickly becomes a must-have style for trendsetters.
- Self-Expression: Just like tattoos or piercings, tooth gems offer a unique form of self-expression. They’re a fun way to show off your personality – whether that means a single diamond-like sparkle for a touch of glamour or a colorful crystal to match your personal style. Many fashion-forward individuals love that tooth gems are eye-catching yet small, so it’s a bit of “bling” that can be as subtle or as bold as you want.
- Temporary Fashion (Low Commitment): Unlike more permanent body mods, tooth gems are temporary and non-destructive. This makes them especially appealing to style enthusiasts – you can try out the look, enjoy it for a while, and remove it when you’re ready for a change. Want a jewel on your tooth just for festival season or a special event? No problem – you can have it for a few months and take it off later.
- Social Media & DIY Culture: On TikTok and Instagram, the hashtag #toothgems has thousands of posts, with users showing off their at-home tooth gem applications, tooth gem kits, and before-and-after transformations. The DIY aspect (more on that later) has made it even more popular; people love that they don’t necessarily need a dentist appointment to join the trend. It’s a fun beauty experiment you can do at home (safely, if done right!).
In short, tooth gems have become a flashy fashion statement. They combine the allure of jewelry with the charm of a bright smile. With celebrities flaunting them and DIY kits readily available, it’s no surprise that more and more people are eager to put some “bling” in their smile.
Are Tooth Gems Safe for Your Teeth?
One of the first questions anyone has before bedazzling their teeth is: “Is this actually safe?” The good news is that tooth gems are generally safe for your teeth when proper materials and techniques are used. However, as with any cosmetic procedure, there are important caveats and care tips to ensure you don’t accidentally harm your pearly whites.
Here’s what you need to know about tooth gem safety:
- No Drilling or Enamel Damage in Application: Unlike procedures such as dental veneers or crowns, applying a tooth gem does not require drilling or removing enamel. The gem is bonded to the surface of the tooth using a special light-cure adhesive. When done correctly, this will not damage the underlying tooth. The process is similar to how orthodontic brackets (braces) are attached, which is designed to be reversible.
- Dental-Grade Adhesives Only: A critical safety factor is the type of adhesive used. Proper tooth gem application uses dental bonding composites or glues that are designed for use in the mouth. These are the same kind of adhesives a dentist uses for things like braces or small repairs, so they bond strongly but are also formulated to be enamel-safe. Never use super glue, nail glue, or other household adhesives for a tooth gem – those can be toxic or cause cracks in your enamel. Quality DIY tooth gem kits will include the right adhesive (or “bonding resin”) for safe application.
- Risk of Plaque Buildup: With a tiny gem on your tooth, you’ll have an extra spot for plaque to potentially accumulate. If oral hygiene is neglected, the area around the gem might see an increase in plaque, which could raise the risk of decay on that tooth. Solution: Maintain good oral hygiene – brush and floss normally (yes, you can and should brush over the tooth gem). Some find flossing around the gem a bit tricky, but it’s important to keep it clean to avoid any decay or gum irritation.
- Size and Placement Matters: Tooth gems are typically very small (often around 1.5mm to 3mm in diameter). Trying to stick a large charm or too many gems on one tooth could create uneven biting pressure or make cleaning difficult. It’s safest to stick with one gem per tooth (commonly on a front tooth) and choose appropriate sizes. A properly sized gem, placed on a smooth surface of the tooth, should not interfere with your bite or harm the tooth. If you ever feel discomfort or the gem is rubbing incorrectly, it’s best to remove it.
- Applied to Healthy Teeth Only: You should only put tooth jewelry on a healthy, clean tooth. If a tooth has untreated cavities, cracks, or other issues, adding a gem could complicate the problem or hide it. It’s wise to have had a recent dental checkup or cleaning before applying a gem, to ensure your teeth and gums are in good shape. Also, the tooth’s surface needs to be very clean and dry during application for the gem to stick well.
- Allergies and Sensitivities: Reputable tooth gem adhesives are medical-grade and generally hypoallergenic. The gems (especially crystal or gold) are inert. However, if you have sensitive teeth or known allergies to dental products, that’s something to consider. A very small percentage of people might have sensitivity to the bonding resin. If you experience tooth sensitivity or gum irritation around a gem that doesn’t resolve in a day or two, consult a dental professional.
- Professional Application vs. DIY: Safety often comes down to who’s doing the application. A trained dental professional or tooth gem technician will know how to apply the gem correctly, minimize risks, and use quality materials. DIY kits can be safe if you follow instructions carefully and use the provided materials properly. The main risks of DIY come from user error – for example, not etching the tooth properly, contaminating the bonding surface with saliva, or using the wrong glue. We’ll discuss how to apply at home safely in a later section. If you’re ever unsure, it’s okay to have a dentist or cosmetic tooth gem specialist do the job for you.
When these guidelines are followed, tooth gems are considered safe and non-damaging to teeth. In fact, when it’s time to remove the gem, it typically pops off cleanly (especially if using a proper removal tool), and any residual bonding material can be polished off, leaving the tooth just as it was before. Many people wear tooth gems for months with no adverse effects – the key is proper care and common sense. (We’ll cover aftercare and removal in a moment, which are also important for safety.)
Bottom line: Tooth gems are safe for your smile as long as you use the right products and technique. Always opt for dental-grade kits (or professional service), keep up your brushing and flossing, and avoid any temptation to pry at the gem or use subpar glues. Do it right, and you can sparkle worry-free! ✨
How Long Do Tooth Gems Last?
Tooth gems are meant to be a semi-permanent adornment – not permanent like a dental filling, but not something that falls off in a day, either. The longevity of a tooth gem can vary quite a bit depending on multiple factors, but generally you can expect a well-applied gem to stay on anywhere from a few months up to a year or more.
Several factors influence how long your tooth gem will last:
- Adhesive Quality: The bonding agent (glue) used is a major factor. Professional-grade light-cure composites (the kind used in dentist offices and high-quality DIY kits) create a strong bond that can make a gem last many months or even over a year. On the other hand, if a low-quality adhesive is used, the gem might pop off much sooner. (This is one reason to avoid cheap DIY methods – the glue matters!)
- Application Technique: Proper application involves cleaning the tooth, etching the enamel slightly (with a special etchant) to create a good surface for bonding, applying the bonding resin, and curing it fully with an LED UV light. If each step is done correctly, the gem will adhere much more strongly and evenly. Mistakes like insufficient curing time or contamination with saliva can weaken the bond, causing the gem to loosen earlier than it should.
- Tooth Surface & Location: Gems placed on front teeth (especially upper incisors) tend to last well because those surfaces are flat and don’t take direct force from chewing. If someone places gems on biting surfaces or edges (not common, but some experiment), they likely won’t last as long due to the force of biting. Also, a very smooth tooth surface holds a gem better than one with a filling or texture.
- Oral Hygiene & Habits: Your daily routine plays a role. If you brush vigorously directly over the gem or use a very hard toothbrush, you might dislodge it over time. Conversely, being gentle around the gem while still keeping it clean is ideal. Also, habits like grinding teeth (bruxism) or frequently picking at the gem with your tongue or fingers can shorten its lifespan. Avoid biting into super hard foods with the gem-tooth; for example, biting candies or opening packets with your teeth is a no-no.
- Lifestyle Factors: Certain substances can potentially weaken the bond over time. For instance, smokers might find the tar and heat affect the adhesive slightly (and also discolor the gem). Diets very high in acidic foods/drinks might very gradually erode the bonding edge. These aren’t drastic factors, but they can contribute over many months.
- Luck (and a Bit of Physics): Sometimes, even when everything is done right, a gem might come off a bit earlier – perhaps you accidentally knocked it with a metal utensil one day, or just the right (wrong!) angle of biting on something caused it to loosen. In other cases, people have reported their gems staying on well over a year without issues. There is a small element of chance and individual variance.
So, what’s a reasonable expectation? On average, tooth gems often last around 6 months to a year before they detach or are ready to be removed/replaced. Many providers say “a few months to a couple of years” to cover the broad range. If you get it done professionally, you might be at the higher end of that range. With a DIY kit, if you follow instructions diligently and use quality materials, you could also achieve many months of wear. If it only lasts a few weeks, something likely went wrong in application – or you gave it a bit too much tough love while brushing or eating.
The nice thing is that even if a tooth gem falls off, it typically doesn’t cause any damage. You might not even notice exactly when it came off (don’t worry – if swallowed, these tiny gems pass through harmlessly). And you can always clean the tooth and reapply a new gem if you want to continue the look.
To maximize how long your tooth gem lasts, use the best materials (quality adhesive and genuine gems) and treat your gemmed tooth with a little extra care as described above. We’ll cover care tips in a section below. But first, let’s talk about the fun part – what kinds of gems and designs you can choose!
Types of Tooth Gems and Design Options
One of the exciting aspects of tooth gems is the ability to personalize your smile bling. There’s a variety of gem types and designs available, so you can choose a style that fits you. Here are some popular tooth gem materials and options:
- ✨ Swarovski® Crystals: These are among the most popular choices for tooth gems. Swarovski crystals are known for their high quality and brilliant sparkle. They come in different colors (clear “diamond” look is most common, but you can find crystals in blue, pink, rainbow, etc.) and sizes (usually 1.5mm up to 3mm for tooth use). They’re lead-free and safe for use in the mouth. A single crystal on a canine or incisor tooth gives a classy, gemstone-like twinkle.
- 💎 Real Diamonds: For the ultimate luxe statement, some people opt for small real diamonds to be attached as tooth gems. Diamonds will certainly shine the brightest and they’re incredibly durable. However, they are pricey and usually require professional application (because you don’t want to lose that!). Some cosmetic dentists offer diamond tooth gem options set in a little gold bezel that’s bonded to the tooth. It’s a tiny statement piece for those who love true luxury.
- ✨ Gold Charms & Shapes: Little gold or white-gold charms can also be used as tooth jewelry. These might be flat, small shapes like hearts, stars, musical notes, etc., made of dental gold. Gold tooth gems give a lovely gleam and can be very eye-catching. Often these are a tad larger than a crystal (to show the shape), so placement needs to be just right. Gold charms are popular for those who want something more distinctive than a simple crystal.
- ✨ Shaped Crystals (Butterflies, Hearts, etc.): Some crystals are pre-cut into fun shapes. For example, you can find butterfly-shaped gems, heart-shaped pink crystals, star shapes, and more. These are usually glass or zirconia-based crystals crafted into shapes. They add a cute or playful touch to your smile. Keep in mind shaped gems cover a bit more tooth surface area, so ensure they’re not too large to fit comfortably.
- ✨ Opals & Pearls: A more niche but gorgeous option: synthetic opal gems (which have that iridescent multi-color look) or tiny pearl-esque stones. These give a softer shine compared to crystals but can look really unique. Ensure any such materials are okay to be in a moist environment long-term (they should be waterproof and non-porous).
- ✨ Mix & Match: Some enthusiasts get multiple tooth gems on different teeth to create a pattern or unique look – e.g., a small crystal on each canine, or one tooth having two gems of differing colors. While you typically wouldn’t cluster gems on the exact same tooth surface (the bonding works best per individual gem), you can definitely have multiple gems across your smile. Just be mindful not to go overboard – a few well-placed sparkles often has more visual impact than too many.
- When choosing your tooth gem, consider the size of your teeth and where the gem will go. A small gem often looks best on a lateral incisor (the tooth next to your big front tooth) or on a canine. If your teeth are on the smaller side, a 1.5mm crystal might be the perfect size. If you have a broader smile or larger teeth, a 2mm or even 3mm gem could work nicely.
Also, think about your personal style and wardrobe. Do you wear more gold or silver jewelry? Then maybe a gold tooth charm or a clear crystal (that looks like a diamond) will complement your look. If you love color, you could choose a birthstone-colored gem or any hue that makes you happy.
Lastly, ensure you’re getting high-quality gems specifically intended for teeth. Premium tooth gems (like the Swarovski-branded ones or those sold by reputable dental suppliers) have smooth backs and won’t leach any dyes or metals. This is important both for adhesion and safety. Steer clear of crafting rhinestones that aren’t meant for body use – they might have backing foils that wear off or contain lead. Always buy your gems from a trusted source or as part of a tooth gem kit from a known company.
How to Apply Tooth Gems at Home (DIY Guide)
One of the reasons tooth gems have become so popular is that you can apply them yourself at home with the right tools and a bit of patience. Many people are opting for DIY tooth gem kits that include all the essentials (we’ll talk more about what to look for in a kit later). Here, we’ll give an overview of the step-by-step process to apply a tooth gem safely at home.
Important: If you’re not confident in doing this yourself, it’s perfectly okay to have a professional do it for you. But if you do want to DIY, make sure to follow each step carefully for the best results. Always use a well-reviewed, high-quality kit – it should include professional dental materials (etch gel, bonding resin, etc.) rather than any shortcuts.
DIY Tooth Gem Application – Step-by-Step:
- Wash and Sanitize – Start by washing your hands thoroughly. You’ll be working inside your mouth, so cleanliness is crucial. It’s also a good idea to wipe the application tools (tweezers, wax applicator, etc.) with some rubbing alcohol to ensure they’re clean. If your kit includes gloves, put on the gloves to keep things hygienic.
- Brush and Dry Your Teeth – Brush your teeth and rinse well, but do not use any toothpaste with fluoride right before application. Fluoride can interfere slightly with the bonding, so best to have plain clean teeth. Pick the tooth where you want the gem (usually a front tooth). Gently dry that tooth with a clean tissue or the gauze provided in the kit. The tooth must be completely dry when applying the gem – moisture is the enemy of good bonding.
- Etch the Tooth Surface – Most professional kits come with an etching gel (usually blue gel with ~37% phosphoric acid, similar to what dentists use). Using the little syringe or brush, apply a tiny dot of etch gel on the spot of the tooth where the gem will go. Let it sit for about 20–30 seconds (or as instructed) – this microscopically roughens the enamel surface, which helps the bonding agent stick strongly. After the time is up, thoroughly rinse off the etch with water and dry the tooth completely again. (Tip: You can use a cotton roll or tissue to keep your lip and tongue away so you don’t re-wet the tooth. Some kits include cheek retractors or cotton rolls for this.)
- Apply Bonding Resin/Adhesive – Now it’s time for the special glue. Your kit should have a bottle of light-cure adhesive (bonding resin). Use a tiny brush or micro-applicator to apply a small amount of the bonding resin on the etched spot of the tooth. It will look like a shiny wet spot. Don’t overdo it; a thin layer is enough. This resin usually stays slightly liquid until you cure it with the light, so you have some working time.
- Place the Gem – Using a wax tip applicator tool (or tweezers if a wax tool is not available), pick up your chosen gem. The wax tip is fantastic here because the tiny gem will stick to the waxy point, allowing you to precisely position it without dropping it. Carefully place the gem onto the tooth where you applied the resin. Take your time to get it positioned just right. The gem will stick to the resin, but you can nudge it gently into perfect position. Make sure it’s oriented properly (for example, if it’s a shaped gem, face it the right way up).
- Cure (Harden) the Bond – Once the gem is in place and you’re happy with the position, it’s time to cure the adhesive with a UV/LED dental curing light. High-quality kits often include a small LED curing light, or you can purchase one separately (they look like little blue-light flashlights). Shine the curing light on the gem/tooth for the recommended time – typically around 20-60 seconds, depending on the light’s strength. The blue light triggers a reaction in the bonding resin, causing it to harden in seconds. Be sure to cure from a couple of angles if possible, to ensure the resin under the gem fully sets. After curing, the gem should be firmly attached.
- Finishing Up – Once cured, gently test the gem with a finger – it should be solidly in place. Remove any excess adhesive around the gem if you see any (some kits include a little tooth cleaning wipe or you can gently brush around it after a short wait). Avoid eating or drinking for about 30 minutes after application to let everything set completely. Also, do not brush that tooth until the next day to give the bond time to fully mature.
That’s it – you should now have a sparkling new tooth gem on your smile! The process, in total, usually takes about 10 to 15 minutes. The actual “work” is minimal; most of the time is ensuring things are clean, dry, and then waiting during the curing phase.
Pro Tips for DIY Application:
- Do the application in a well-lit area, in front of a mirror. A magnifying mirror can help since you’re working with tiny gems.
- Patience is key. If at first the gem sticks to the applicator more than the tooth, try curing just a tiny tack of the resin first, then place the gem so it grips better (advanced technique some use). But generally, just be gentle and persistent – it will stick.
- Use the buddy system: If you have a friend or family member with steady hands, it can be helpful to have them place or cure the gem for you, especially if you’re doing a tooth on your own smile. Many people successfully apply their own, but having a helper is never a bad idea for precision.
- Only apply one gem at a time. Doing multiple in one session can be tricky because you have to keep the area dry. Better to do one, ensure it’s a success, then later you can add another if desired.
- Read the kit instructions! Different products may have slightly different curing times or steps – follow those specifics if they differ from the general steps above.
By following these steps, you can get a result that looks just as good as a professional application. A quality DIY kit basically gives you the same materials a tooth gem technician would use in a salon. The main differences are your comfort and skill, so don’t rush and you’ll be showing off that new sparkle in no time.
Essential Tools and Products for Applying Tooth Gems
When setting out to apply tooth gems, having the right tools and products is crucial for both a successful application and the safety of your teeth. Here’s a rundown of the essentials you’ll need (many of which come included in a good tooth gem kit):
- 💎 High-Quality Tooth Gems: First and foremost, the gems themselves. Make sure you have premium quality gems – ideally made for dental use (Swarovski crystals, dental gold charms, etc.). Quality gems will have a flat back for proper adhesion and won’t have any coatings that can dissolve. Using the real deal ensures maximum sparkle and safety.
- 🌀 Etching Gel: This is a mild acid gel (usually phosphoric acid) used to “etch” or microscopically roughen the tooth enamel where the gem will go. It’s a standard step in dentistry for bonding procedures and is critical for the gem to stick properly. Etch gel typically comes in a syringe for easy application. Only a tiny drop is needed. (Always follow the included instructions for how long to leave it on – usually ~20-30 seconds.)
- 🪄 Bonding Resin (Dental Adhesive): After etching, you apply a bonding resin – often a light-cure adhesive that remains slightly sticky until cured with the UV light. This resin is what truly locks the gem onto the tooth when hardened. Professional-grade resin is the same type used for white fillings or braces attachments, so it’s strong and tooth-safel. In kits, it may come in a small bottle and sometimes labeled as "dental glue" or "light cure adhesive." Some kits have a two-part system (a primer and a composite) – but many simplify it for you.
- 🔦 LED Curing Light: A UV/LED curing light is what you use to harden the resin. If you’ve ever been to the dentist and seen them use a blue light tool when doing a filling – that’s it. Some DIY kits include a mini LED curing light (often battery powered). If not, you can purchase small dental curing lights online. They are usually LED lights in the 405nm wavelength range. Without a curing light, the resin might eventually harden over hours (some are dual-cure), but it won’t be secure immediately – so a curing light is highly recommended to set the gem on the spot.
- ✨ Wax Tip Applicators: One game-changing tool for tooth gem application is the wax tip applicator (also called a wax picker or wax micro brush). This is essentially a small stick or brush with a tacky wax end that lightly sticks to a tiny gem. It allows you to pick up those slippery little crystals and accurately place them on the tooth without dropping or fumbling. LaserGlow’s wax applicator, for example, is a disposable micro brush with a wax-coated tip that grips Swarovski crystals securely for fast, no-slip placement. If your kit doesn’t have one, you might use fine tweezers, but honestly, the wax stick is so much easier and is very affordable. It prevents frustration and keeps the process hygienic (since you’re not touching the gem with fingers).
- 🔹 Tooth Gem Glue/Composite: Sometimes kits might include a small syringe of flowable composite. In the LaserGlow kit, for instance, there’s a 2g syringe of light-cure flowable composite included. This composite is like a clear or tooth-colored resin material that adds bulk under the gem for a secure hold. It’s used alongside the adhesive. Not all kits separate the “bond” and “glue” steps, but professional setups often have an adhesive plus a little drop of composite for strength. If your kit has this, you’d place a tiny dab of composite on the tooth after the adhesive, then put the gem on that, then cure. It fills any gaps between the flat gem and the curved tooth surface, ensuring a snug fit.
- 🧰 Other Accessories: Good kits will also include helpful accessories like microfiber brushes or micro-swabs (for applying adhesive without fuzz), cotton rolls or gauze (to keep area dry and cheeks away), latex gloves, and sometimes even a little mouth retractor to help you keep your lips out of the way. You might also get a small mirror or pick tool. While these extras aren’t absolutely required, they definitely make the process easier and more professional. If your kit doesn’t have them, you can DIY with cotton pads, Q-tips (careful with fibers), and a steady hand.
- 📦 Tooth Gem Removal Tool (for later): While not needed for application, it’s worth mentioning here: consider getting a tooth gem removal tool for when you eventually want to take the gem off. This is a tool that looks like a small pair of pliers specifically designed to gently pop off a tooth gem without damaging the tooth. LaserGlow makes a popular removal tool modeled after orthodontic pliers. It grips the gem and breaks the adhesive seal safely. Having this on hand means you won’t be tempted to pick or pry off the gem with something improper (which could harm your enamel). We’ll talk more on removal in the next section, but it’s wise to have the tool ready.
In summary, using the proper tools is half the game in successful tooth gem application. If you purchase a comprehensive kit from a reputable brand, you should receive all or most of the items listed above. Always check what’s included. If something critical (like the curing light or etch gel) is missing, you may need to buy it separately or choose a better kit. Cutting corners on tools or products can lead to poor results or even damage – for example, using non-dental glue would be a big mistake, as mentioned earlier.
At LaserGlow, we offer a Professional Tooth Gem Kit that comes with the full etch, bond, and glue system used by pros, so you’re set up for success from the start. Additionally, tools like our wax-tip applicators and removal pliers are available to complete your toolkit. By equipping yourself with these quality tools, you’re ensuring that your tooth gem application will be easier, safer, and longer-lasting.
Aftercare Tips: Keeping That Sparkle Strong
You’ve got your tooth gem applied – great! Now, how do you take care of it so that it stays shining and stays put for as long as possible? Thankfully, tooth gem aftercare is pretty straightforward. In many ways, you’ll treat it like just another part of your tooth, with a couple of gentle precautions. Here are some tips to maintain your new jewel-adorned tooth:
- Maintain Good Oral Hygiene: This is the golden rule. Brush your teeth at least twice a day and floss once a day, just as you normally would. A tooth gem won’t prevent you from cleaning that tooth – you might just need to be a tad more deliberate. Use a soft-bristled toothbrush and gentle pressure when brushing over the gem so you don’t snag it. Flossing is important because plaque can build up around the edges of the gem. You may consider using a water flosser to more easily rinse around the gem and between teeth. Keeping the area clean will prevent any staining or decay around the gem.
- Be Gentle Initially: In the first 24-48 hours after application, try to avoid very hard brushing or biting directly on the gem. This gives the bond time to fully strengthen. Also, extremely hot or cold foods right after application might slightly shock a freshly bonded gem, so moderate temperature exposure in the first day.
- Avoid Biting Hard Objects on That Tooth: Tooth gems are pretty sturdy, but biting down on something hard directly with the gem could dislodge it. So, no biting pen caps, opening bottles, or crunching ice with the tooth that has the gem. If you’re eating something like an apple or crusty bread, bite with the side that doesn’t have the gem (or cut food into pieces). Basically, use common sense to not put undue pressure on the little jewel.
- Skip Harsh Chemicals on the Gem: Using normal toothpaste (including whitening toothpaste) and mouthwash is fine – these are formulated for teeth and won’t harm the gem or bonding. However, avoid direct use of any strong chemicals not meant for your mouth (for example, don’t apply whitening gel or bleaching strips over the gem; they likely wouldn’t stick well there anyway). Also, if you’re a fan of at-home remedies like charcoal powder, be cautious – gritty powders might get under the gem edges. Stick to dentist-approved cleaning agents.
- Check the Gem Periodically: Each day when you brush, just give a quick thought to the gem: Is it still feeling solid? No catching on anything? This helps you catch if it ever gets loose. If the gem does feel a bit loose or wiggles, it’s probably nearing time to come off – don’t force it, but plan to gently remove it (or have it removed) soon so you don’t accidentally swallow it or choke. Usually, you’ll know well in advance because it will start to feel less firmly attached.
- No Picking or Prying: It can be tempting to fiddle with the gem with your tongue (you will definitely feel it there for the first day or so until you get used to it). Try not to! Constant tongue prodding can loosen it. And absolutely resist any urge to pry at it with fingernails or tools. Not only could you pop it off prematurely, but you could hurt your tooth or swallow the gem unexpectedly. If it’s bothering you or you’re over it, just remove it properly (more on that next).
- Protect from Grinding: If you know you grind or clench your teeth at night (bruxism), a gem might be at risk especially if it’s on an edge that contacts other teeth. In such cases, wearing a night guard can protect both your teeth and the gem. However, most people place gems on the outer surface of upper front teeth, which typically don’t grind together.
- Regular Dental Checkups: Continue your routine dental visits. Let your dentist know you have a tooth gem – most dentists are familiar with them. They will avoid accidentally scraping it off during cleaning, and they’ll also inspect the area around it to ensure no plaque is accumulating. Dentists largely agree that tooth gems are fine as long as they’re monitored and the patient maintains good hygiene. If you ever have a dental procedure needed on that tooth (like a filling near it), the gem might need to be removed first.
By following these tips, you should enjoy your tooth gem trouble-free for its entire duration. Essentially, treat your gemmed tooth kindly: keep it clean, avoid unnecessary force on it, and it will stay shiny and secure.
And if at any point you decide the gem isn’t for you anymore, or it has been on for a long time and you’re ready for a change, it’s easy to take off – which brings us to the next section.
How to Remove a Tooth Gem Safely
Because tooth gems are bonded with a strong adhesive, removal isn’t just a matter of peeling it off like a sticker. Never try to yank or pop off a tooth gem with random household tools like pliers, knives, or your fingernails – this can definitely scratch your enamel or even crack a tooth. The key to safe removal is to use the correct tool and technique to gently break the adhesive bond.
Here are the recommended ways to remove a tooth gem safely:
- Professional Removal: The safest option is to visit a dentist or professional tooth gem technician. Dentists have a tool that resembles small pliers (called orthodontic pliers) that they use to crack the adhesive seal. They will position the plier on the gem and apply a little pressure; the gem usually “pops” off cleanly. After that, the dentist can polish off any residual bonding material from your tooth, returning it to its original smoothness. This procedure is quick and typically painless (you might feel a slight pressure or hear a click when it comes off). If you’re nervous about doing it yourself, a quick trip to a dental professional can take care of it in minutes.
- At-Home Removal Tool: If you prefer not to make a special trip to the dentist, you can use a dedicated tooth gem removal tool at home. These are essentially the same style of small pliers dentists use, but made for consumers too. For example, the LaserGlow Tooth Gem Removal Tool is a stainless steel tool with fine, angled tips designed to grip the gem and safely pop it off. The shape targets only the gem and adhesive, not your tooth, so you don’t scratch the enamel. To use such a tool, you would: sanitize it (e.g., with alcohol), position the tips around the gem, gently squeeze and wiggle just a bit until you feel the adhesive give way. The gem will come off, and you can catch it in a tissue or your other hand. Any tiny bits of remaining adhesive on the tooth can be gently scraped with a dental pick or even a firm toothbrush, or you can wait for your next dental cleaning where they can buff it off. The removal tool method is pretty user-friendly – LaserGlow’s tool, for instance, is designed so even non-professionals can use it confidently.
- Do Not Force It: If a gem is being stubborn and not coming off easily with a removal tool, don’t forcefully twist or yank harder. Instead, consider asking a professional for help. Stubborn bonds might need a dentist to polish the top of the gem off (using a drill with a polishing bur) to weaken it, then remove. This is rare, but it’s important not to damage your tooth in pursuit of removal.
- When Gems Fall Off Naturally: Sometimes, especially after many months, a gem might loosen and fall off on its own (usually while brushing or eating). If that happens, just verify that it came off completely (tooth feels smooth where it was). You’ll likely feel the difference with your tongue immediately. Check that there’s no chunk of glue left – if there is, you might feel a rough spot, which a dentist can polish away. If it’s clean, just remember to not bite down if you find the gem in your food! Again, the gem itself is tiny and harmless if swallowed inadvertently, but of course be careful.
- After Removal – Tooth Care: Once the gem is off, treat that tooth gently for a day. There might be a little residual roughness from leftover adhesive, but you can brush normally. If you have a smoothing dental wax or a polishing strip, you could buff it lightly, but generally it’s best left to a dentist’s cleaning. The enamel under a properly-bonded gem should be intact and healthy. In fact, many times it’s in better shape than surrounding enamel because it was partially sealed off from acidic foods while covered by the gem! Still, keep the area clean and perhaps use a fluoride mouthwash to strengthen the enamel after prolonged coverage (just as a precaution).
- Reuse or New Gem: Removed gems cannot be reattached (the backside will have old adhesive and they usually get a bit damaged when pried off). If you love the look and want it back, you’ll need a new gem and adhesive to do it again. Think of it like press-on nails or eyelash extensions – once removed, you start fresh if you want it again. The good news is you can change up the design or try a new shape/color if you decide to reapply a new one!
Having a proper removal tool on hand, like the one LaserGlow offers, can be a smart move even if you got your gem applied professionally. It means you have control to take it off whenever you choose (maybe you have a job interview or an MRI scan or simply want a new style) without an extra appointment. According to LaserGlow’s guide, using the dedicated tool mimics a dentist’s gentle approach and avoids damage. It’s a small investment for peace of mind.
Safety first: whether by a pro or at home with the right tool, tooth gem removal should never result in pain or significant enamel loss. If done correctly, you’ll be left with a tooth that looks just the same as before the gem. And that’s one of the best parts of tooth gems – you can enjoy them while you want them, and remove them without lasting effects when you’re ready.
Choosing a Quality Tooth Gem Kit (What to Look For)
Now that you know all about tooth gems – what they are, how to apply and care for them – you might be thinking of getting a tooth gem kit to try this fun trend yourself. Before you buy, it’s important to know what makes a tooth gem kit high quality and worth your money, especially since this involves your dental health. A good kit will set you up for success (a beautiful, long-lasting gem) and safety. Here are the factors and components to look for in a tooth gem kit:
- ✔️ Premium Gems Included: The kit should include a set of high-quality tooth gems, preferably crystals from a known brand (like Swarovski) or medical-grade gems. Check if the gems are described as lead-free, polished, and meant for use on teeth. Cheap kits might throw in craft rhinestones which aren’t ideal. You want gems that will truly shine and not discolor. Also, variety is nice – does the kit come with multiple colors or sizes? That can be a bonus so you have options.
- ✔️ Dental-Grade Adhesives: This is a make-or-break component. A proper kit must include the right dental bonding materials – typically an etch gel, a bonding resin, and possibly a flowable composite. Look for keywords like “light cure adhesive,” “dental bond,” “etch gel 37%,” etc., in the kit description. If a kit only offers a bottle of generic “glue” without saying what it is, be cautious. LaserGlow’s Professional Tooth Gem Kit, for example, clearly lists the contents: phosphoric acid etch, light-cure adhesive, and flowable composite – these are what professionals use. That’s the kind of detail you want.
- ✔️ Tools and Accessories: As discussed in the tools section, having things like wax applicators, micro brushes, and a curing light are very important. A great kit will include a small LED curing light (many do; some call it a UV light). It should also have wax sticks or at least fine tweezers, micro-applicator brushes for the adhesive, and maybe cotton rolls or cleaning swabs. Compare kits – the ones that come with the full set of tools will make your life easier. If something like a curing light is not included, factor in the cost and hassle of getting one separately.
- ✔️ Instructions & Support: There should be a clear instruction manual or guide in the kit. Applying a tooth gem involves multiple steps, so good kits will provide step-by-step directions (with pictures if possible). Some reputable sellers also have tutorial videos online or customer support if you have questions. This shows that the company cares about you doing it right, not just about selling products.
- ✔️ Safe Removal Option: It’s a plus if the kit or the same vendor offers a removal tool as part of a bundle or an add-on. While not always bundled together, being able to get the proper removal pliers from the same place ensures you’re prepared for later. For instance, LaserGlow provides both the application kit and a matching removal tool, so customers have a one-stop solution. If a kit mentions a removal plan (“easy removal” in instructions or includes a tool), that’s a good sign of a complete solution.
- ✔️ Trusted Brand and Reviews: Since tooth gems are somewhat medical (they involve your teeth), it’s wise to purchase from a trusted brand or retailer. Look at reviews from other buyers – are people happy with the kit? Did they successfully get their gems to stick? Also consider if the brand specializes in teeth whitening or dental products (like LaserGlow does), which can indicate expertise. Be cautious of no-name kits from unknown sources, as the materials might be subpar. A little research goes a long way in ensuring you get a safe product.
- ✔️ Value (Don’t Just Go Cheap): While everyone loves a good deal, be wary of kits that are significantly cheaper than others – they may be cutting corners on quality. On the flip side, the most expensive kit isn’t automatically the best either. Look at what’s included. A $50-$70 kit that includes a curing light, 20+ genuine Swarovski crystals, and full dental-grade bonding set is actually decent value compared to how much a single professional application can cost. Remember, you’re possibly getting multiple applications out of it (many kits have enough supplies for several gems). Don’t skimp on quality when it comes to something going in your mouth.
- Here’s a quick checklist of items a great tooth gem kit will have:
- ✅ Quality tooth gems (crystals or charms) – assorted sizes/colors
- ✅ Etch gel (usually blue, in a syringe)
- ✅ Bonding resin/adhesive (bottle or syringe)
- ✅ Flowable composite (often a small syringe, adds strength)
- ✅ LED curing light (small handheld UV light device)
- ✅ Wax tip applicators (or fine tweezers at minimum)
- ✅ Micro brushes or applicator sticks (for the adhesive)
- ✅ Cotton rolls/gauze (to keep area dry)
- ✅ Alcohol wipes or cleaning swabs (for prep)
- ✅ Gloves and/or masks (hygiene items, sometimes included)
- ✅ Written instructions (guide booklet or online link)
If you’ve got a kit that checks almost all those boxes, you’re in good shape! That means you have the same tools a pro would use, and you’re ready to sparkle up your smile safely and effectively.
LaserGlow’s tooth gem product line, for example, is designed with both professionals and DIY enthusiasts in mind, which means they emphasize quality and ease-of-use. The gems are premium, the adhesives are long-lasting dental-grade, and tools like the wax applicator brush make precise placement a breeze. Plus, being trusted by professionals (as LaserGlow is) adds confidence that these products won’t let you down.
Investing in a good kit not only ensures your tooth gem will look fabulous, but also saves you potential headaches (or toothaches!) from using inferior materials. When it comes to your smile, quality and safety should be the top priority.
Sparkle Safely and Stylishly: Final Thoughts
Tooth gems are a dazzling way to express yourself and add a bit of bling to your everyday look. As we’ve explored, they blend the worlds of beauty and dental care – and with the right approach, they can be a safe, fun, and temporary form of self-expression. Let’s quickly recap the journey to a gem-studded smile:
-
Understand the Trend: Tooth gems (aka teeth gems or dental jewelry) are tiny jewels attached to your tooth surface, a trend made popular by celebrities and social media. They hark back to ancient traditions of adorning teeth, but today’s methods are advanced and non-invasive.
-
Safety First: When applied with proper dental adhesives and techniques, tooth gems do not harm your teeth. Always use quality materials – your smile’s health is paramount. Keep up good oral hygiene and be mindful of that little gem when chewing or brushing.
-
Application & Tools: Thanks to modern DIY kits, you can apply tooth gems at home by following careful steps – cleaning, etching, bonding, curing – much like a mini dentist procedure in your bathroom. Essential tools like wax tip applicators and curing lights make the process smoother. If in doubt, professionals are there to help; there’s no shame in having a dentist bedazzle your tooth for you!
-
Enjoy and Care: Once on, treat your gemmed tooth kindly. Brush gently, avoid chomping on hard foods with it, and show off that smile! Your gem can last for many months, sparkling each day, and can even be swapped out for a new style when you feel like it.
-
Removal and Change: When it’s time for a change or the gem’s life is over, remove it the right way – ideally with a proper removal tool or by a professional. Your tooth will be back to normal and ready for whatever’s next (maybe another gem, maybe not).
At the end of the day, a tooth gem should be a source of joy – a little confidence booster every time you grin. If you run an online search or scroll through #toothgems now, you’ll see countless individuals proudly flaunting their glittering teeth, each gem reflecting a bit of their personality. It’s amazing how such a tiny adornment can have a big impact on style and self-expression.
If you’re ready to jump in on this trend, make sure you do it with the best tools and products available. That’s where we at LaserGlow are happy to help: from our Premium Tooth Gem Kit that includes all the pro-grade essentials, to our wax applicators for precise placement, and the gem removal tool for whenever you need it – we’ve got everything to make your tooth gem experience easy, safe, and fabulous. We even offer genuine Swarovski crystals in various styles so your sparkle is top-notch.
Shine on! With your new knowledge, you can confidently add some glimmer to your smile, knowing you’re doing it the right way. So go ahead – embrace the trend, enjoy the compliments on your new “tooth jewelry,” and most importantly, have fun with it. Here’s to brighter, bolder smiles adorned with beautiful tooth gems. Keep sparkling! 😁✨


