Welcome to the ultimate guide on tooth gem jewelry – from playful butterfly and heart tooth gems to high-fashion designer tooth jewelry. Learn why this tooth bling trend is booming, how to safely bedazzle your teeth, and how LaserGlow’s professional products can help you shine.
What Are Tooth Gems and Why Are They Trending?
Tooth gems (also known as tooth jewelry or dental jewelry) are tiny adornments applied to the surface of a tooth, adding a sparkle to your smile. They can be crystals, rhinestones, or even shapes made of gold and diamonds. Attaching a tooth gem is generally painless and non-invasive – no drilling or needles required, similar to bonding a braces bracke. In fact, when done properly with dental-grade materials, it usually doesn’t damage your enamel at all. It’s a temporary accessory, so you can swap out your tooth decoration jewelry whenever you want a new look.
Why the sudden popularity? The tooth gem trend actually harks back to the Y2K era (early 2000s) and has made a comeback thanks to social media. On TikTok and Instagram, influencers and celebrities are reviving this nostalgic craze. For example, pop stars like Rosalía have been spotted with multiple tiny gems on their teeth, and FKA Twigs has worn dazzling letters and stones on her smile. Tooth gems deliver that retro “90s/2000s bling” vibe that’s huge right now – think rhinestone belts and glitter everywhere – but in a fresh, subtle way. Unlike grills (the mouthpieces covering several teeth), tooth gems are small, semi-permanent accents that let you embellish your smile with minimal effort. They’re a form of self-expression, turning your teeth into a fashion statement.
Another reason for their global popularity is how accessible tooth gems have become. You no longer have to visit an expensive dentist or jeweler to get that sparkle. DIY tooth gem kits (like those from LaserGlow) let anyone safely apply tooth gems at home. Beauty salons and dental spas worldwide offer tooth gem application as a quick add-on service. With the right materials and technique, adding a little “tooth bling” is as easy as putting on false lashes – and just as fun. From teens on TikTok to brides looking for a special touch, everyone is jumping on the tooth gem trend.
Popular Tooth Gem Designs and Styles
One of the most exciting aspects of tooth gem jewelry is the variety of designs available. Whether you’re into cute shapes or luxury logos, there’s a tooth gem style for every personality and aesthetic. Here are some of the most sought-after designs trending globally:
Butterfly Tooth Gems: Playful Fluttering Sparkle
Butterfly tooth gems are a favorite for those who want a whimsical, eye-catching smile. Shaped like tiny butterflies, these gems add a playful charm every time you grin. Many tooth gem enthusiasts search for a tooth gem butterfly design because it brings a pop of personality and creativity to your look. Butterfly designs can come as flat gold charms or be created using crystal gems arranged in a butterfly shape. For instance, some people use two small pearly crystals as wings and a tiny gem as the body to mimic a butterfly on their tooth.
Why butterflies? Butterflies symbolize transformation and joy, making them a perfect motif for a smile makeover. They’re popular at music festivals, summer events, and anywhere you want to show off a free-spirited vibe. Celebrities have been seen sporting butterfly tooth gems as part of the Y2K fashion resurgence, and the style has taken off on social platforms. The great thing about a butterfly tooth gem is that it stands out yet remains elegant – it’s a conversation starter that isn’t too over-the-top.
If you love the idea of butterfly tooth gems, LaserGlow can help you achieve it. While LaserGlow’s Swarovski Tooth Gems are round crystals, you can create a butterfly effect by choosing the right colors and arrangement. For example, pick two lavender crystals for “wings” and a clear crystal for the “body” to craft a subtle butterfly on your canine tooth. The genuine Swarovski® crystals will give you that brilliant sparkle and precision-cut shine that makes your butterfly really pop. Plus, LaserGlow’s crystals are enamel-safe and lead-free, so you can bling out your tooth with a butterfly knowing the materials won’t harm your smile.
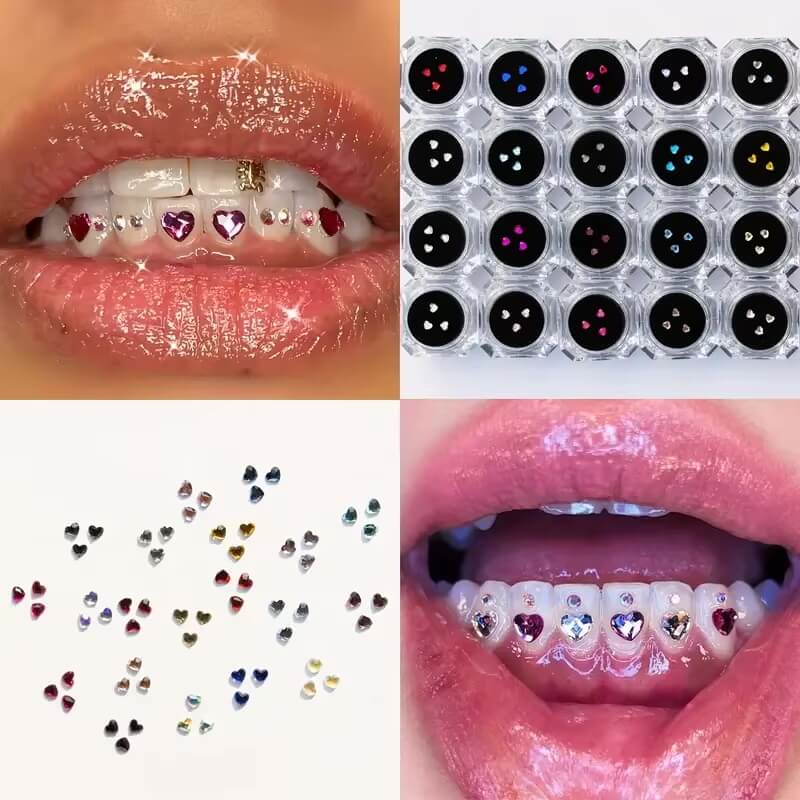
Heart Tooth Gems: Sweetheart Sparkle for Your Teeth
Nothing says cute and stylish quite like a heart-shaped tooth gem. Heart tooth gems are adored by many for the sweet, affectionate touch they add to a smile. You can opt for a tiny heart charm (often available in 18k or 24k gold) or use colored crystals to form a heart. For example, a small ruby-red crystal on your tooth gives the illusion of a little red heart – perfect for those who love romantic or Kawaii-inspired looks.
Heart tooth gems gained popularity as a way to show a bit of love in one’s style – literally wearing your heart on your…tooth! They’re especially popular around Valentine’s Day, weddings, or anniversaries, but plenty of people rock hearts year-round just to express their lovable personality. A heart tooth gem complements any smile with a touch of whimsy and warmth. You can go subtle with a clear or pink heart that twinkles when it catches the light, or go bold with a bright red or even black heart for contrast.
To get a heart tooth gem look with LaserGlow products, you have a couple of options. If you want a true heart shape, LaserGlow offers high-quality crystals in various colors – you might choose a vibrant red from the Swarovski crystal collection and pair it with a second gem to suggest the shape of a heart. Or simply place a single heart-colored gem (like a red or pink stone) on your tooth as a minimalist nod to the heart shape. Swarovski crystals are perfect for this because their facets produce incredible brilliance, making even a small gem catch the eye. The crystals come in different sizes (e.g., 1.8 mm and 2.2 mm), so you can pick a size that creates the heart look you want. The best part is these crystals won’t tarnish or stain – a common issue with cheaper gems – thanks to their platinum foil backing. Your heart will stay shining bright every time you smile.
Designer Tooth Gems and Logos: High-Fashion Dental Bling
For those who want to take tooth jewelry to the next level of luxury, designer tooth gems are the answer. These are tooth gems inspired by high-fashion brands and iconic logos – truly tooth gems with logo designs that make a bold statement. Imagine flaunting a miniature Louis Vuitton “LV” logo or Chanel’s famous interlocking Cs on your tooth. It’s like wearing designer jewelry, but on your smile!
LV logo tooth gems and Chanel tooth gems have surged in demand as more fashion-forward individuals embrace tooth jewelry. Typically, these come as tiny 18k gold charms crafted in the shape of the brand’s logo, or as meticulously cut crystal shapes. They allow you to bring a bit of your favorite luxury brand into your personal style in a quirky, unexpected way. Want to show you’re all about luxury? A glimmering gold LV on your lateral incisor will do the trick. Love classic couture? A little Chanel “C” on your canine tooth says it with a sparkle.
Even though these designer-inspired tooth gems are small, they pack a big punch in style. They’ve been spotted on influencers and even mentioned in fashion circles as the new must-have accessory for those who love labels. And it’s not limited to LV or Chanel – some people get creative and wear other logos or symbols (like Gucci’s double G, a dollar sign, or their favorite brand’s emblem) as dental jewelry. It’s the ultimate fusion of fashion and fun.
If you’re craving a designer tooth gem look, LaserGlow’s products can help you achieve a safe and stunning result. While LaserGlow focuses on Swarovski crystal tooth gems for brilliance and durability, you can incorporate gold logo charms alongside crystals for that designer effect. The key is to ensure any charm is genuine gold (18k or 24k) to avoid tarnish or reactions in your mouth. You could place a gold logo gem on one tooth and accent it with a couple of Swarovski crystals on adjacent teeth for extra sparkle. For example, a gold Chanel “CC” on one tooth flanked by shimmering clear crystals from LaserGlow can create a deluxe look. Remember, quality matters – cheap knockoffs might discolor or irritate you. LaserGlow’s gems are dental-grade, safe, and made for long-term wear, so mixing them with a high-quality gold charm gives you a best-of-both-worlds result.
Other Creative Tooth Gem Ideas
Beyond butterflies, hearts, and logos, there’s a whole world of creativity for tooth gems. Here are a few trending ideas:
- Gem Clusters: Instead of a single gem, cluster 2-3 small crystals together on one tooth to form shapes like a flower or a tiny constellation of stars. Multi-gem designs can be stunning and personalized.
- Alternate Teeth Patterns: Some fashionistas alternate gems on their canines or across their smile – for instance, a pattern like gem-no gem-gem-no gem on adjacent teeth, creating a symmetric glimmer.
- Mixing Colors: Don’t be afraid to play with colored crystals. Rainbow tooth gems or birthstone-colored gems let you coordinate with outfits or show your personal flair.
- Theme Sets: Match your tooth gem to your nail art or makeup. For example, if you have butterfly nail art, a butterfly tooth gem ties the theme together. Or if you’re rocking Chanel earrings, a Chanel tooth gem complements it in an unexpected way.
- Seasonal Sparkle: Some people change their tooth gems by season – a snowflake or icy blue gem in winter, a clear crystal (to mimic a water droplet) in spring, a sunflower yellow gem in summer, etc. Since tooth gems aren’t permanent, you can swap styles when you feel like a refresh.
The possibilities are endless. The bottom line is: tooth gems let you get artistic with your grin, whether you prefer something sweet and subtle or bold and bougie. Always use high-quality gems and proper adhesive (more on that next) to ensure your creative tooth jewelry stays secure and safe.
Materials Matter: Swarovski Crystals vs. Gold Charms
When it comes to tooth gem jewelry, the materials you choose make a huge difference in both appearance and safety. The two most common options are crystal gems (like Swarovski crystals) and metal charms (usually gold). Each has its own appeal:
- Swarovski Crystal Tooth Gems: These are extremely popular because of their brilliant sparkle and variety of colors. Swarovski is a renowned Austrian brand known for precision-cut crystals. LaserGlow’s Swarovski Tooth Gems are authentic, lead-free crystals made specifically for tooth application. They have a special flat platinum foil backing which not only makes them shine brighter by reflecting light, but also resists staining and tarnishing. Crystals come in sizes typically around 1.8 mm to 2.5 mm – small enough to sit on a tooth without feeling bulky. Because they are smooth and rounded, they won’t irritate your lips. The color choices are vast (clear, pink, blue, yellow, green, you name it, so you can really personalize your look. High-quality crystals like Swarovski won’t dull over time, and they are enamel-safe. They’re bonded to the tooth with dental composite, so no drilling is needed and they can last for months with proper care.
- Gold and Diamond Tooth Gems: For a more luxurious tooth jewelry option, many turn to gold charms or even real diamonds set in gold. Gold charms give a classy yellow or white gold shine that perfectly complements real jewelry you might be wearing (like gold earrings or a necklace). Some gold tooth gems are even embellished with tiny diamonds for extra glam. Because they’re made of real gold, they won’t rust or corrode in your mouth. However, gold pieces are typically more expensive than crystals and usually a bit heavier. They must be applied carefully with strong dental bond so they stay on. One advantage of gold charms is their unique shapes – you can get almost any design (letters, symbols, etc.) crafted in gold. They tend to stand out more against your tooth due to the metallic shine.
- Other Materials: Occasionally, you’ll see tooth gems made from opals, pearls, or other gemstones. There are also novelty tooth gems like glow-in-the-dark stones or UV-reactive gems for those who really love to experiment. No matter the material, it’s crucial that anything you put on a tooth is non-toxic, lead-free, and meant for oral use. That’s why sticking with established brands (Swarovski for crystals, or genuine gold for charms) is wise – you know those are safe. Avoid cheap craft rhinestones or any metal that can tarnish or leach when wet.
In summary, if you want maximal sparkle and color variety, Swarovski crystals are a fantastic choice (and budget-friendly for multiple gems in a pack). If you want a distinctive shape or a luxurious touch, gold tooth gems might be your style. Many people mix and match – for example, a small diamond in a gold setting on one tooth, and a couple of Swarovski crystals on another tooth for color. LaserGlow specializes in top-quality Swarovski tooth gems because they offer a combination of beauty, safety, and durability that’s hard to beat for both beginners and professionals.
(Internal tip: LaserGlow’s Swarovski crystals come in a pack of 20, giving you plenty of gems to play with different designs. They have been precision-cut for maximum light reflection, so even under low light your teeth will literally glitter)
How to Apply Tooth Gems Safely (Professional vs DIY)
Safety is paramount when adding anything to your teeth. The good news is that tooth gems, when applied correctly, are relatively safe and won’t harm your teeth. Here’s how to ensure your tooth gem application is done right, whether you go to a professional or do it yourself at home with a kit.
Professional Application
Visiting a dentist or trained tooth gem technician is the most foolproof way to get a tooth gem. Professionals have the proper tools and materials to ensure the gem adheres well and your tooth remains healthy. Here’s what typically happens at a tooth gem appointment:
- Cleaning and Prep: The tooth’s surface is polished and cleaned. Often, they’ll isolate the tooth to keep it dry (since saliva can interfere with bonding).
- Etching: A mild acid etch gel is applied to the tooth enamel for about 20-30 seconds.This gel microscopically roughens the enamel surface, creating tiny pores so the bonding agent can grip better. It’s a safe process used in dentistry for braces and fillings too.
- Bonding Agent: After rinsing off the etch and drying the tooth, a bonding agent (dental adhesive resin) is applied. This is like a primer that helps the composite adhere strongly.
- Placement of Gem: A small amount of composite resin (tooth gem glue) is placed on the tooth where the gem will go. Using a precise tool (often a wax tip applicator or tweezers), the gem is picked up and carefully placed onto the composite blob on your tooth. The Tooth Gem Wax Applicator from LaserGlow is a great example of a placement tool – it has an ultra-tacky wax tip that grabs even tiny crystals easily and lets the stylist position them exactly right, without dropping them. This ensures flawless placement, which is key for both look and longevity.
- Curing: Once the gem is in position, a special blue UV/LED light is used to cure (harden) the adhesive. It’s the same type of light used for dental fillings or gel manicures. Curing takes about 20-60 seconds. After curing, the composite sets, locking the gem onto your tooth.
- Finishing Touches: The tech may floss around the gem to ensure no excess glue remains, and polish any rough edges of composite if needed. You’re then good to go!
When done professionally, the tooth gem can last anywhere from 6 months up to a couple of years, depending on the adhesive and how well you care for it. Dentists use high-quality materials that are designed not to damage enamel. In fact, the process only alters the very surface of the enamel (a microscopic etch), which typically can be polished off later if needed. The important thing is that no drilling is involved and the integrity of your tooth is preserved.
DIY Application with a Tooth Gem Kit
Thanks to comprehensive kits like the LaserGlow Tooth Gem Kit, you can safely apply tooth gems at home. A good kit will mirror the steps a professional uses, supplying you with the necessary dental-grade materials. LaserGlow’s kit, for example, is a complete etch-bond-glue system containing a 37% phosphoric acid etch gel, a bonding resin, and a light-cure adhesive, plus tools to apply them. This is essentially the same stuff a dentist would use, packaged for DIY use.
Here’s how you would use a DIY tooth gem kit safely:
- Start with a Clean Tooth: Brush and floss your teeth, and rinse well. The tooth you’re decorating should be plaque-free and dry. (Pro tip: you can use a cotton roll to keep the area dry while working.)
- Apply Etch Gel: Using the etch provided, apply a tiny drop on the tooth surface where the gem will go. Let it sit for ~20 seconds (follow your kit instructions). This preps the enamel so the gem will stick better. Rinse it off thoroughly and dry the tooth (usually kits include a suction or you can just wipe it and air dry – tooth must be completely dry for the next steps).
- Add Bonding Agent: Some kits have a separate bonding liquid – apply a thin layer on the etched spot and air-dry it (or gentle air from a syringe). This primes the surface.
- Place the Adhesive: Put a small dot of the provided composite resin (often a flowable dental composite) on the tooth. Not too much – just enough to cover the gem’s base. LaserGlow’s kit includes a crystal-clear light-cure adhesive that’s designed to hold gems securely.
- Pick Up the Gem: Using a tool like the wax tip applicator, pick up your chosen gem. The LaserGlow Wax Applicator tool is ideal here, as its ultra-tacky tip can pick up crystals, gold charms, even teeny diamonds without fuss. It also has a fine point for visibility, so you can see exactly where you’re placing the gem.
- Place the Gem & Adjust: Carefully press the gem into the blob of adhesive on your tooth. You have a few seconds to adjust it before curing (the glue won’t harden until you use the UV light). Make sure the gem is positioned how you want and facing the right way (if it’s a shape like a heart or logo).
- Cure the Gem: Shine the UV/LED curing light (often kits have a small LED light included) onto the gem for the recommended time (usually 30-60 seconds). This will harden the adhesive fully, locking the gem in place.
- Finish: Gently run your tongue over the gem’s edges to feel for any excess resin. If you feel a little extra, you can use the edge of a dental tool or even a clean toothpick to scrape off any overhang of glue around the gem. Avoid biting down on anything hard for the next hour or two.
- That’s it – you’ve got a sparkling new tooth gem, no dentist visit required! The first time might feel a bit fiddly, but these kits are designed for ease. LaserGlow’s kit, for example, is beginner-friendly and comes with detailed instructions (and even tutorial resources) to guide you. By following the proper steps, you’ll get a result that looks professional and lasts a long time. In fact, a well-applied gem from a DIY kit can last around 12 months before it loosens– comparable to what you’d get at a salon, because you’re using professional-grade materials.
Important Safety Notes for DIY:
- Always use dental-grade adhesives. Do NOT use household glue, super glue, nail glue, or any glue not meant for teeth – those can be toxic or damage your enamel.
- Work on one tooth at a time and keep the area dry. Moisture is the enemy of a good bond.
- If you feel any pain (which is rare, since it’s external on enamel), or if the process seems too difficult, stop and seek professional help. There should be no pain – tooth gem application only affects the outer enamel.
- Follow the kit’s aftercare instructions (see next section) to avoid dislodging the gem prematurely.
By using a trusted kit like LaserGlow’s, you’re essentially doing what a pro would do, just on your own. It can save you money and let you change up your style whenever you want, safely. And if you’re a beauty professional or aspiring tooth gem technician, such kits are also perfect for offering tooth gem services to clients with confidence in the materials.
Aftercare Tips for Long-Lasting Sparkle
Once your new tooth gem is on, you’ll want to take care of it so it stays shiny and secure. Here are some aftercare tips and best practices:
- Immediate Aftercare (First 24-48 hours): For the first day or two, treat your new gem gently. If possible, avoid very hard or sticky foods on that side of your mouth (biting into a hard apple or chewy candy could dislodge a fresh gem). Also, try not to brush directly over the gem for the first 12-24 hours – let the adhesive fully set. Don’t pick at the gem with your fingers or tongue, even though it might feel new or strange at first. If you got your gem done professionally, follow any specific instructions they gave (some suggest not eating or drinking for an hour right after application to ensure the bond sets properly).
- Daily Oral Hygiene: You can (and should) still brush your teeth normally! A gem won’t prevent you from keeping your teeth clean. Use a soft-bristled toothbrush and brush gently around the gem. Take a little extra care to brush around the edges of the gem to prevent any plaque build-up. Flossing is important too – floss like normal. If the gem is near where you floss, just be gentle so you don’t tug the gem. Antibacterial mouthwash can help keep the area clean as well. Remember, gems can create a tiny spot for bacteria to hide, so good hygiene is key to avoid any risk of decay around the gem.
- Watch What You Bite: Tooth gems are sturdy when properly bonded, but chewing extremely hard foods (ice, hard candy) or habits like crunching on nutshells could put stress on the gem. You don’t have to cut these out completely, just be mindful – don’t directly chomp down on the gem with something very hard. Likewise, avoid using that tooth to tear open packages (but you shouldn’t do that anyway for your teeth’s sake!).
- No Fiddling: It’s tempting to touch your gem with your tongue (you will feel it there until you get used to it). But excessive prodding could loosen it over time. Definitely avoid picking or scratching at it with your fingernails or any tools. Treat it like a tiny jewel – look, but don’t pry.
- Checkups: If you wear a gem for many months, have your dentist take a quick look during routine checkups. They’ll ensure no plaque is hiding around it and that it’s still secure. Most dentists are fine with tooth gems as long as they’re maintained well. Some dentists even offer them as part of cosmetic services.
By following these tips, your tooth gem will stay beautiful for as long as possible. Many users report their gems staying on 6 months to a year or more with no issues, until they decide to remove or replace them. That brings us to the next point: how do you remove a tooth gem when you’re ready for a change?
Safe Removal and Changing of Tooth Gems
Tooth gems are not permanent – and that’s part of the appeal. You can take them off or swap them out when you want a new style. However, removal should be done carefully to avoid harming your tooth. Never force or yank off a gem with random tools, as that can indeed damage your enamel or even crack the tooth surface. Here’s how to do it the safe way:
Professional Removal: The safest method is to have a dentist or trained technician remove the gem. They have a tool similar to orthodontic pliers that can gently crack the bond and pop the gem off. They may then polish off any remaining bonding composite, leaving your tooth just as it was before. Dentists often use a dental drill with a polishing tip to buff away the glue – it’s quick and usually painless (since enamel has no nerves). This ensures absolutely no residue is left. If you plan to remove one gem and maybe get another in its place, you could do it all in one visit.
At-Home Removal: If you applied the gem yourself or can’t get to a dentist, you can remove a gem at home with the right tool and technique. LaserGlow actually offers a specialized Tooth Gem Removal Tool designed for safe at-home removal. It’s a professional-grade stainless steel instrument modeled after what dentists use (a precise angled plier). The way it works is you disinfect the tool, then use its angled tips to gently grip the gem and apply slight pressure to shear it off the tooth. Because the bonding agent is like cement, squeezing the gem from the sides usually causes the composite to fracture and the gem will pop off cleanly. This needs a steady hand, but it’s pretty straightforward – no yanking straight outward, just controlled pressure. The LaserGlow removal tool is designed to target the gem without slipping, so you don’t accidentally squeeze your tooth or gums. It allows you to remove a Swarovski crystal or small charm in minutes, just as a dentist would, but at home. This is perfect if you like to change your gems frequently or if a gem has loosened and you want to take it off safely.
After the gem is off, there might be a bit of bonding resin left on the tooth. You can usually scrape off any leftover glue with a dental pick or even gently with the edge of the removal tool. Another trick: a fine dental polishing strip can help rub off residual adhesive. If it’s stubborn, a quick polish by a dentist will smooth it out.
The enamel under a properly placed gem will typically be absolutely fine – it might look a little dull until the residue is cleaned, but it should not have any permanent damage. Tooth enamel is the hardest substance in the body, and the bonding process only affects the very surface. Many people who remove a gem find that their tooth looks good as new after a polish, with no sign it was ever there.
Note: Avoid trying to pry a gem off with your nails, knives, or other improvised tools – those can slip and hurt you, or take off a chunk of enamel. Also, do not attempt to dissolve the gem off with any chemicals. It’s best to either use a proper removal tool or see a professional. The LaserGlow Tooth Gem Removal Tool gives peace of mind that you can take off your gem when you want without a dental visit, which is super convenient for DIY gem enthusiasts.
Once the gem is removed, you can immediately replace it with a new one (if the tooth surface is still good and you re-etch and bond it) or you can just leave it natural. There’s no significant evidence that having a gem for a while and removing it will cause any lasting harm, as long as it was maintained well. Just resume normal dental hygiene, and your tooth will be just fine.
Styling Ideas: How to Rock Your Tooth Gems
Now that you know all about butterfly, heart, and designer tooth gems, as well as how to apply and remove them safely, let’s talk style! Tooth gems are meant to be fun, so how you show them off is entirely up to you. Here are some styling ideas and tips to make the most of your sparkling smile:
- Keep It Subtle for Everyday: If you want a daily driver look, go with a single crystal on a lateral incisor (the tooth next to your front teeth) or on a canine. A small clear or light-colored gem will catch the light when you talk or grin, but it’s subtle enough for work or school. Many people start with just one tiny gem as an introduction – it’s surprisingly elegant and not immediately obvious until someone is close to you.
- Match Your Makeup or Outfit: Coordinate the color of your tooth gem with your makeup palette or wardrobe. Wearing a red dress tonight? That red heart tooth gem is going to tie it together in a cheeky way. Got a rainbow pride theme? Apply a few gems in different colors across your teeth for a celebratory sparkle. Since LaserGlow’s Swarovski gems come in various shades, you can really play with color matching.
- Festival & Party Vibes: Going to a festival, rave, or party? That’s the time to go all-out. Try multiple gems – maybe a butterfly tooth gem on one side and a heart gem on the other. Or create a mini pattern like three gems in a diagonal line on one tooth (yes, that’s a trend too!). The key at events is to coordinate with face gems or glitter: many festival-goers stick crystals on their face and one on their tooth to complete the look. It makes for awesome selfies under stage lights or a disco ball.
- Mix with Grills or Jewelry: If you have a gold tooth cap or a grill, a tiny crystal on another tooth can complement it. For example, a bottom tooth grill paired with a top tooth Swarovski gem is a very Y2K hip-hop meets modern chic combination. Or if you have a piercing (like a lip or nose piercing), a tooth gem can mirror the metal or jewel of the piercing.
- Seasonal/Theme Ideas: As mentioned, adapt your tooth gem to seasons or themes. A small crystal snowflake charm for winter holidays, a diamond-like gem for New Year’s Eve, a pink heart for Valentine’s, a green gem for St. Patrick’s, etc. It’s a fun way to be festive without a huge commitment. Since applying a new gem with a kit is quick, you can change it up for a special occasion and remove it later with the Removal Tool when the season passes.
- Confidence is Key: No matter what style you choose, wear it with confidence. Tooth gems are meant to make you smile more and express yourself. At first, you’ll be super aware of it – you might even talk differently for a few hours until you adapt. But soon it becomes a natural part of you, and you might find yourself smiling wide at every mirror or photo op to show it off. That little sparkle can truly boost your mood and let your personality shine.
Why Choose LaserGlow for Your Tooth Gem Needs?
As you dive into the dazzling world of tooth gems – from butterflies to hearts to designer logos – it’s crucial to use products you can trust. LaserGlow is a leader in professional tooth gem supplies and teeth aesthetics, and for good reasons:
- Premium Quality Crystals: LaserGlow offers Swarovski Tooth Gems that are authentic and high-grade. You’re getting the same brilliant crystals used by dentists and high-end salons. They’re cut for maximum sparkle and have an enamel-safe backing. Lesser imitation crystals just can’t mimic that Swarovski shine or safety standard.
- Complete DIY Solutions: If you’re looking to apply gems at home, LaserGlow has you covered end-to-end. The Tooth Gem Kit provides everything you need – from etch gel to bonding resin to adhesive – in one package, so you don’t have to hunt down products from different sources. It’s formulated for safe, long-lasting results, giving you up to “12-month sparkle” longevity with proper application. The kit takes the guesswork out of DIY, making it easy even for first-timers.
- Professional-Grade Tools: Precision matters in tooth gem application, and LaserGlow’s tools are top-notch. The Wax Tip Applicator is a must-have for placing gems perfectly on the first try, preventing the #1 issue of gems falling off due to poor placement Likewise, the Tooth Gem Removal Tool is a game-changer for safely taking off gems without a trip to the dentist. These tools are engineered based on what professionals use, but made accessible for home users and stylists.
- Safety and Trust: All LaserGlow products are designed with safety in mind – from dental-grade adhesives to lead-free crystals. You can feel confident that using these on your teeth won’t cause harm when instructions are followed. LaserGlow’s tooth gem glue and materials are the same type used by cosmetic dentists, meaning they bond well but also come off without destroying your enamel. Trust is key when it comes to anything health-related, and LaserGlow has built a reputation for quality in the teeth whitening and gem space.
- Expert Guidance: LaserGlow doesn’t just sell you products – they support you with knowledge. Their website and blog (like this one!) provide tutorials, tips, and answers to common questions. Whether you’re unsure how long to cure the gem or how to sanitize the tools, LaserGlow offers guidance so you can use their products like a pro. This is especially helpful if you’re a beauty technician adding tooth gems to your services; you have a partner in LaserGlow for both supplies and know-how.
- Global Accessibility: LaserGlow ships to a global audience, so no matter where you are, you can get your hands on these tooth gem goodies. They understand that the tooth gem craze is worldwide – from the USA to Europe to Asia, tooth jewelry is a hot trend, and LaserGlow’s products are designed to meet international standards. With reliable shipping and customer service, you won’t be left hanging when you decide to bling your smile.
By choosing LaserGlow for your tooth gem journey, you’re investing in a safe, stylish, and satisfying experience. Whether you just want one pretty crystal on your tooth or you plan to offer tooth gem applications to friends or clients, having the right supplies makes all the difference in the results. LaserGlow combines the educational aspect (so you do it right) with the promotional – they genuinely want your smile to shine and for you to enjoy the process.
Ready to sparkle? Explore LaserGlow’s range of tooth gem products and let your smile express your style. With butterflies, hearts, logos, or simply brilliant crystals, you can turn your grin into a work of art. As the saying goes, ”Don’t forget to smile” – and now with tooth gems, you’ll never want to! So go ahead, join the global tooth gem trend with confidence, and shine on. 😁✨


