Teeth Whitening & Tooth Gem Blog | Expert Guides | LaserGlow

How Much Do Tooth Gems Cost?
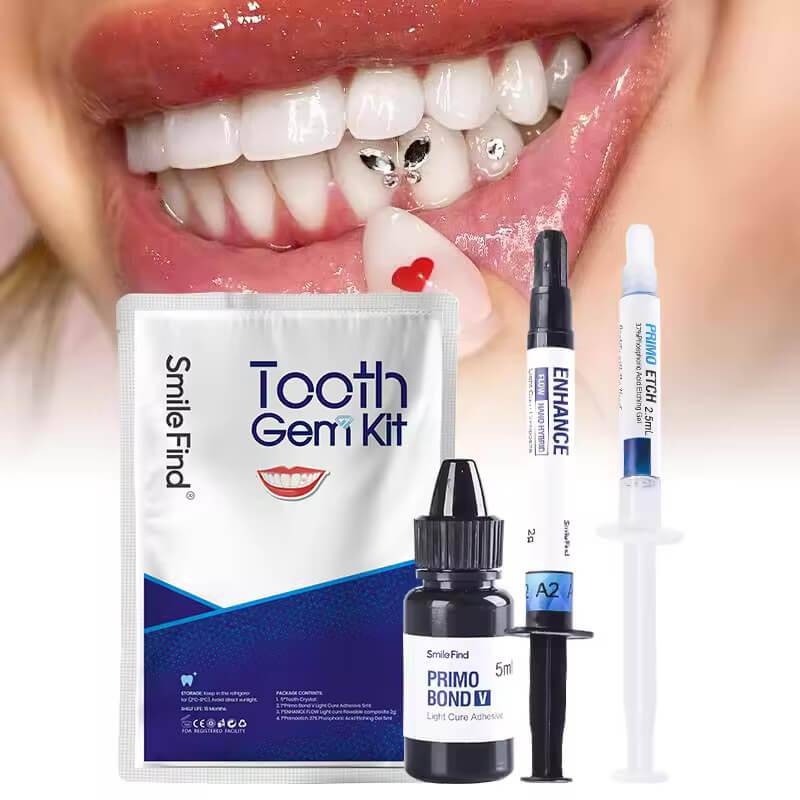
2026 Tooth Gem Price Guide How Much Do Tooth Gems Cost? Most professional tooth gem placements cost between $50 and $150 for a single crystal. Multi-gem designs, shaped gems, gold accents, and custom layouts usually range from $150 to $500+, while luxury or multi-tooth designs can cost more. Pricing depends on the gem style, design complexity, provider experience, bonding materials, and location. Reviewed by David Hanna, RDH — Registered Dental Hygienist, 10+ years in cosmetic & preventive care · Updated April 28, 2026 Tooth gems have moved from a celebrity trend into a mainstream smile accessory offered by beauty studios, whitening bars, med-spas, and dental professionals. But pricing can be confusing because service menus vary wildly. One studio may charge $50 for a single gem, while another charges $250 for a shaped design. Naturally, humans saw one tiny crystal and created an entire pricing maze. This guide breaks down average tooth gem pricing in 2026, what affects the cost, how professional placement compares to DIY kits, what removal usually costs, and how to decide whether a tooth gem is worth it. Full tooth gem resource: For application steps, enamel safety, aftercare, and removal guidance, visit the LaserGlow Tooth Gem Resource Center. Tooth Gem Prices in 2026: Average Cost by Service Type Here is a realistic breakdown of what tooth gems typically cost by service type. Prices vary by provider, city, gem material, and design complexity. Service Type Typical Price Range Best For Single crystal tooth gem $50 – $150 First-time clients, simple sparkle, fast appointment Two-gem or small cluster design $100 – $250 More visible sparkle while keeping the design simple Multi-gem cluster $150 – $350 Custom layout, symmetrical designs, statement looks Gold or silver foil accent $80 – $200 Minimal metallic detail without a large charm Butterfly, heart, cross, or shaped tooth gem $150 – $500+ Designer-style tooth gem looks and social media content Luxury or custom multi-tooth design $300 – $1,000+ Advanced layouts, premium materials, full smile styling Tooth gem removal $25 – $75 Professional removal and polish when you are ready At-home tooth gem kit $20 – $150+ Practice, training, short-term looks, or professional supply restocking depending on kit quality Most professional appointments include a short consultation, placement, curing, and aftercare instructions. Removal is usually priced separately unless the provider includes it in the original service. What Affects the Cost of a Tooth Gem? The biggest pricing differences come from materials, time, training, and how complex the final design is. A single crystal placed on one tooth is faster and easier than a multi-gem cluster or shaped charm. Gem style: standard crystals are usually the most affordable, while shaped charms, metallic accents, and custom pieces cost more. Design complexity: a single gem can be quick, while clusters, symmetry, spacing, and multi-tooth layouts require more time. Provider experience: dental professionals, trained tooth gem technicians, and licensed providers may charge more because they understand enamel safety, infection control, curing technique, and removal. Bonding materials: proper etch, bond, tooth-safe adhesive, and LED curing equipment affect both cost and retention. Location: major markets such as New York, Los Angeles, Miami, and Toronto often charge more than smaller cities. Longevity tip: A $120 tooth gem that lasts 8 months can cost less per month than a cheaper placement that falls off in 3 weeks. Tiny math tragedy, but useful. See: How Long Do Tooth Gems Last? Professional Tooth Gems vs DIY Kits: Which Costs More Long-Term? DIY tooth gem kits can be cheaper upfront, but the value depends on what is inside the kit. A professional setup should include proper prep, tooth-safe bonding materials, placement tools, and an LED curing light. Cheap kits that rely on random glue or craft-style supplies may cost less, but they usually do not offer the same retention, finish, or safety profile. Professional tooth gem placement Usually costs $50–$150 for a single crystal Often lasts several months with proper technique and aftercare Uses controlled placement, isolation, curing, and aftercare guidance Includes access to professional removal or polishing when needed At-home or beginner tooth gem kits Usually cost $20–$150+ depending on kit quality Retention depends heavily on the materials and how carefully the protocol is followed Best used for practice, training, short-term looks, or professional supply restocking Should never use nail glue, super glue, or household adhesive Build a professional tooth gem setup with etch, bond, adhesive, crystals, placement tools, and an LED curing light: Shop Professional Tooth Gem Kits & Supplies Are Tooth Gems Worth the Cost? Tooth gems can be worth the cost when they are applied with proper materials and removed professionally. They are semi-permanent, reversible, and usually require no downtime. A well-placed crystal or charm can stay on for months with simple aftercare. The cost-per-day can be surprisingly low. A $100 tooth gem that lasts 6 months costs about $0.55 per day. A $200 design that lasts 8 months costs about $0.83 per day. Somehow, sparkle has a subscription model now. The real value depends on retention, placement quality, enamel safety, and whether the provider gives proper aftercare and removal guidance. Removal guidance: Read the Tooth Gem Removal Guide to understand how gems are safely removed and polished. Tooth Gem Cost: Frequently Asked Questions How much does a tooth gem cost on average?+ A single professional tooth gem usually costs $50–$150. Multi-gem designs, gold accents, shaped charms, and custom layouts usually range from $150 to $500 or more depending on design complexity, provider experience, and location. How much does tooth gem removal cost?+ Professional tooth gem removal usually costs $25–$75 depending on the studio, number of gems, and whether polishing is needed afterward. Some providers include removal in the original service, but many charge separately. Why do some tooth gem studios charge more than others?+ Pricing depends on provider training, bonding materials, design complexity, city, studio overhead, and whether professional removal or aftercare support is included. Higher pricing can reflect better materials and more controlled application. How long do tooth gems last at different price points?+ Professional placements using proper prep, tooth-safe adhesive, and LED curing often last 3–12 months with good aftercare. Lower-cost placements or incomplete kits may last less if prep, curing, or placement is not done correctly. Are tooth gems expensive to maintain?+ Tooth gems are usually low-maintenance. Most clients only need normal brushing, careful flossing, and professional removal when ready. If a gem falls off early, rebonding may cost $30–$75 depending on the provider. Where can I buy professional tooth gem supplies?+ LaserGlow carries professional tooth gem kits including etch, bond, adhesive, crystal tooth gems, LED curing lights, wax applicators, and removal tools through the LaserGlow Tooth Gem Kits & Supplies collection. Shop Professional Tooth Gem Kits and Supplies Whether you are a trained provider building a tooth gem service menu or a professional restocking supplies, LaserGlow carries the key materials needed for a complete tooth gem setup. Professional Tooth Gem Kit: Etch, Bond & Glue Premium Crystal Tooth Gems Butterfly Tooth Gems Heart Tooth Gems LED Curing Light Tooth Gem Business Starter Kit For step-by-step application, aftercare, and removal guidance in one place: Visit the Tooth Gem Resource Center Reviewed by David Hanna, RDH — Registered Dental Hygienist, 10+ years in cosmetic and preventive dental care · Updated April 28, 2026
Learn more
Are Tooth Gems Bad for Your Teeth? What Pros Recommend | LaserGlow
Real-World Guidance Are Tooth Gems Safe for Your Teeth? Short answer: tooth gems can be enamel-safe when applied with professional materials and removed correctly. The real risks come from low-quality adhesives, untrained application, and DIY removal. Use this myth-busting guide to decide confidently, then see our clinical Aftercare & Safety page for the technical details. Reviewed by David Hanna, RDH — Licensed Dental Hygienist · Updated April 28, 2026 Think of tooth gems like semi-permanent jewelry for your smile. Done well, they are temporary, non-invasive, and confidence-boosting. Done poorly, they can irritate gums, trap plaque, or scratch enamel. Below, we separate myths from facts, give you a quick safety checklist, and flag situations where you should wait. Need the clinical protocol, hygiene steps, and enamel-safe do’s and don’ts? Read our Professional Aftercare & Safety Guide. Myths About Tooth Gem Safety Myth: “Tooth gems drill into your teeth.” Fact: Proper application is non-invasive. There should be no drilling on sound enamel. A dental-grade resin bonds the gem to the surface and can be polished off professionally. Myth: “They always ruin enamel.” Fact: Enamel issues usually come from wrong adhesives or DIY removal. With professional materials and correct removal, enamel should remain smooth and intact. Myth: “You can use nail glue.” Fact: Household glues can irritate gums, stain enamel, and are not designed for use in the mouth. Only use products intended for teeth and applied by trained providers. Myth: “Brushing will knock it off.” Fact: With a proper bond and curing, normal brushing is fine. Use gentle passes around the gem with a soft-bristle brush and keep flossing as usual. Quick Safety Decision Checklist Use this two-minute checklist before saying yes to a tooth gem appointment: Provider: Are they trained or licensed? Do they explain etch, bond, LED curing, and aftercare? Materials: Are the gems and adhesives designed for teeth, not craft gems or nail glue? Placement: Is the location low-stress and away from biting edges? Hygiene plan: Do you understand brushing, flossing, and what to avoid in the first 24 hours? Exit plan: Do they offer professional removal and polishing when you are ready? Want pro-level longevity tips instead of DIY hacks? See our Tooth Gem Longevity Guide. Who Should Wait Before Getting a Tooth Gem? Anyone with active cavities, untreated gum disease, or cracked teeth. Anyone with new orthodontic attachments or recent whitening sensitivity. Anyone playing high-contact sports without a mouthguard. Anyone seeing a provider who offers nail glue, super glue, or cannot explain their adhesive system. Red flag: Pain, ongoing sensitivity, or a rough edge catching floss should be checked professionally instead of ignored. Teeth are famously bad at healing from bad decisions. What Professionals Actually Worry About Dental professionals are generally cautious about unregulated adhesives and DIY removal, not the concept of tooth gems themselves. The safest approach is to use dental-intended materials, follow proper bonding steps, keep hygiene strong around the gem, and rely on professional removal when you are done. Want the enamel-safe routine and post-care steps? Open the Aftercare & Safety Guide → Safer Choices Start with Better Materials If you are shopping for gems or kits, choose products intended for teeth. Never use craft crystals, nail glue, super glue, or household adhesives. Quality materials reduce irritation risk and support smoother removal later. Premium Crystal Tooth Gems — brilliant clarity designed for smiles Tooth Gem Kit: Etch, Bond & Adhesive — professional-grade bonding system Removal Tool — for trained providers only Tooth Gem Safety FAQs Do tooth gems damage enamel? Tooth gems should not damage enamel when bonded with dental-intended materials and removed professionally. Most enamel problems come from unregulated glues, poor placement, or DIY removal. Can I keep brushing and flossing normally with a tooth gem? Yes. You should brush gently around the gem with a soft-bristle toothbrush and continue flossing normally. Avoid hard biting directly on the gem and follow first-24-hour aftercare instructions. Who should wait before getting a tooth gem? Anyone with active cavities, untreated gum disease, cracked teeth, recent whitening sensitivity, or high-contact sports without a mouthguard should wait and consult a dental professional first. Is nail glue safe for tooth gems? No. Nail glue, super glue, and household adhesives should never be used for tooth gems. They are not designed for the mouth and may irritate gums, stain enamel, or make removal unsafe. How should tooth gems be removed? Tooth gems should be removed professionally using the correct tools and polishing technique. Picking, scraping, or trying to remove a gem at home can increase the risk of enamel damage. Bottom Line: Are Tooth Gems Safe? Tooth gems can be safe for enamel when you choose a trained provider, dental-intended materials, and proper aftercare. Skip shortcuts, avoid DIY removal, and book professional removal when you are ready. Reviewed by David Hanna, RDH — Licensed Dental Hygienist. Want the safe, professional setup? Safety comes down to prep, materials, and proper removal. Use the right protocol, then use the right tools. Next reads Application Tooth Gem Application Guide The step-by-step workflow for clean bonding, placement, and curing. Read application Removal How to Remove Tooth Gems Safely Correct removal method to avoid enamel damage and leftover adhesive. Read removal Longevity How Long Do Tooth Gems Last? Real timelines plus aftercare rules that prevent early pop-offs. Read longevity Recommended pro tools Essentials Etch + Bond + Glue Kit Proper enamel prep and bonding. The safe and stays-on part. Shop essentials Removal Tooth Gem Removal Tool Professional removal without picking, scraping, or enamel drama. Shop removal tool Gems Premium Crystal Tooth Gems Clean edges and better comfort for day-to-day wear. Shop crystals All-in-one Tooth Gem Business Starter Kit Complete pro setup for technicians who want consistency. Shop starter kit Pro note: Avoid nail glue, super glue, or DIY hacks. Safe bonding requires correct prep and proper curing.
Learn more
How Long Do Tooth Gems Last?
Most professionally applied tooth gems last 3–12 months. Here's what affects longevity, the habits that help or hurt retention, and how to get the most months out of your gem.
Learn more
How Do Tooth Gems Stay On?
Tooth Gems · Bonding + Longevity Updated Guide How Do Tooth Gems Stay On? Tooth gems stay on through a dental-style bonding process. The tooth surface is cleaned and isolated, enamel is lightly etched, a bonding agent and tooth-safe adhesive are applied, the gem is placed, and an LED curing light hardens the bond. This guide explains the full bonding process, how long tooth gems last, what causes early failures, and how to remove them safely. Reviewed by David Hanna, RDH — Registered Dental Hygienist · Updated April 28, 2026 · Published by LaserGlow Shop Tooth Gem Kits Business Starter Kit Application Guide Jump to a section: What Are Tooth Gems? How Tooth Gems Stay On How Long Do Tooth Gems Last? Safety and Enamel Protection How to Make Tooth Gems Last Longer How to Remove a Tooth Gem Tooth Gem FAQ Professional Tooth Gem Toolkit The short answer: tooth gems stay on through a bonding process. The tooth surface is cleaned, isolated, lightly etched to create micro-retention, coated with a bonding agent, and then the gem is set in a small amount of tooth-safe adhesive. An LED curing light hardens the bond and secures the gem to the enamel surface. No drilling is needed when placed properly on healthy enamel. What Are Tooth Gems? Tooth gems are small flat-back crystals, charms, or decorative designs bonded to the outer enamel surface as cosmetic smile jewelry. Common styles include single crystals, butterfly tooth gems, heart gems, gold foil accents, and custom cluster arrangements. They are semi-permanent and removable by a trained professional. Best placement surface: Tooth gems bond best to smooth, healthy natural enamel. They are not recommended on crowns, veneers, or teeth with significant enamel wear. Read more: Are Tooth Gems Safe? Browse available designs: LaserGlow Tooth Gem Kits & Supplies, including crystals, butterfly sets, heart gems, and complete professional kits. How Tooth Gems Stay On Your Teeth The bond strength comes from four things working together: enamel preparation, bonding agent, controlled adhesive placement, and full LED curing. Skip or rush any of these and the gem is more likely to fail early. Because apparently enamel does not accept shortcuts. Rude, but fair. 1 Tooth Preparation and Isolation The tooth is cleaned and fully dried. Cotton rolls or a cheek retractor help isolate the field. Moisture at any stage weakens the bond, which is why isolation matters. 2 Enamel Etching A mild etching gel is applied, rinsed, and dried to create microscopic surface texture. This helps the resin lock onto the enamel surface. 3 Bonding Agent and Adhesive Placement A bonding agent is applied in a thin, even layer. A small amount of tooth-safe adhesive is placed before the gem is set. Too much adhesive creates messy margins and weaker-looking results. 4 LED Curing An LED curing light hardens the bond from multiple angles. Under-curing is one of the most common reasons tooth gems pop off early. Never use super glue, nail glue, or craft adhesive. These products are not designed for use in the mouth. They can irritate soft tissue, bond unpredictably, and make removal unsafe. Only tooth-safe bonding materials should be used on enamel. For a complete clinical walkthrough with placement and curing tips, see the Tooth Gem Application Guide and download the free Professional Tooth Gem PDF. How Long Do Tooth Gems Last? With professional-grade materials and proper technique, tooth gems typically last several months. Many professional placements last 3–12 months, and some last longer depending on placement, oral habits, diet, and aftercare. What affects tooth gem longevity Adhesive quality: the bonding system matters more than the gem itself. Curing time and angle: under-cured adhesive produces a weak bond. Oral habits: biting hard foods, chewing ice, nail-biting, pen chewing, or persistent tongue pressure can shorten wear time. Placement surface: gems bond most durably on healthy, smooth natural enamel. Aftercare compliance: sticky and hard foods in the first 24 hours are a common cause of early pop-offs. For a complete longevity guide: How Long Do Tooth Gems Last? Are Tooth Gems Safe for Your Enamel? Yes, tooth gems can be safe for enamel when applied and removed correctly by a trained provider using tooth-safe materials and proper technique. Tooth gems do not require drilling when placed on healthy natural enamel. The main risks are predictable: non-dental adhesives, aggressive DIY removal, bonding over compromised enamel, and poor hygiene around the gem. Avoid those and tooth gems are a safer cosmetic service. Deeper reading: Are Tooth Gems Safe?, reviewed by David Hanna, RDH. How to Make Tooth Gems Stay On Longer The difference between a gem that lasts six weeks and one that lasts six months is usually technique and aftercare, not just the gem itself. Use this checklist for better retention. Prep properly: clean, isolate, etch, rinse, and dry before bonding. Use a wax tip applicator: precise placement helps create cleaner margins. Cure completely: cure from multiple angles and do not rush this step. Protect the first 24 hours: avoid sticky, chewy, or hard foods and do not bite directly on the gem. Keep the area clean: brush gently with a soft-bristled toothbrush and floss carefully around the gem site. For full aftercare instructions to give clients: Tooth Gem Aftercare Guide How to Remove a Tooth Gem Safely Tooth gem removal should be performed by a trained professional using controlled polishing instruments, not by picking, prying, or biting it off. A well-applied gem can be removed safely with the right finishing and polishing steps. After removal, the enamel surface should be polished smooth and inspected. The goal is to remove adhesive residue without scratching or thinning enamel. Full removal guidance: Tooth Gem Removal Guide and the LaserGlow Professional Tooth Gem Removal Tool. Tooth Gem FAQ How do tooth gems bond to your teeth?⌄ Tooth gems bond to enamel through a tooth-safe adhesive system. The enamel is lightly etched to create micro-retention, a bonding agent is applied, a small amount of adhesive is placed, the gem is set, and an LED curing light hardens the bond. Are tooth gems permanent?⌄ No. Tooth gems are semi-permanent. They can last several months with correct application and aftercare, and they can be removed professionally without damaging enamel when proper technique is used. Why do tooth gems fall off?⌄ Early failures are usually caused by insufficient prep, moisture contamination, under-curing, the wrong adhesive, placement on a poor bonding surface, or habits like biting hard foods, nail-biting, or picking at the gem. Can I apply tooth gems myself at home?⌄ Professional application by a trained provider is strongly recommended. The prep, bonding, and curing steps require proper materials and technique. Avoid any kit or method that uses nail glue, super glue, or non-dental craft adhesive. Is it safe to eat with a tooth gem?⌄ Yes. After the first 24–48 hours, most clients can eat normally. During the first day, avoid sticky, hard, or chewy foods and do not bite directly on the gem. Can tooth gems damage your teeth?⌄ Tooth gems applied and removed correctly with tooth-safe materials should not damage healthy enamel. The main risks come from non-dental adhesives, bonding over unhealthy enamel, poor hygiene around the gem, or aggressive DIY removal. Who should apply tooth gems professionally?⌄ Tooth gems should be applied by trained providers who understand bonding materials, enamel safety, infection control, curing technique, aftercare, and professional removal. Where can I buy professional tooth gem supplies?⌄ LaserGlow offers professional tooth gem kits, crystal tooth gems, LED curing lights, wax applicators, and removal tools through the LaserGlow Tooth Gem Kits & Supplies collection. Professional Tooth Gem Toolkit Consistent, enamel-conscious results come down to the right materials. Here are the core components of a professional tooth gem setup: Professional Tooth Gem Kit: Etch, Bond & Glue Premium Crystal Tooth Gems LED Wireless Curing Light Tooth Gem Wax Tip Applicator Professional Tooth Gem Removal Tool Tooth Gem Business Starter Kit Free professional guide: Download the complete LaserGlow Tooth Gem How-To PDF, including step-by-step protocol, placement guidance, aftercare instructions, and removal guidance. Reviewed by David Hanna, RDH. Reviewed by David Hanna, RDH · Registered Dental Hygienist · Last updated April 28, 2026 · Tooth Gem Resource Center Pro Toolkit Tooth Gem Starter Kit Best for ProsComplete setup for consistent, enamel-conscious results Etch + Bond + Glue KitThe foundation of a lasting bond LED Curing LightUnder-curing can cause early failures. Don’t cut corners. Wax Tip ApplicatorPrecise placement and fewer re-dos Removal ToolProfessional removal without enamel damage Shop All Tooth Gem Supplies Related Guides Tooth Gem Application GuideStep-by-step placement and curing protocol How to Remove Tooth GemsProfessional removal and what to avoid How Long Do Tooth Gems Last?Real longevity ranges and what shortens them How Much Do Tooth Gems Cost?Typical pricing and what affects the rate Are Tooth Gems Safe?Enamel safety, risks, and professional best practices Tooth Gem Resource CenterFull hub: guides, kits, designs, aftercare, FAQ
Learn more
Wax Brush Applicator for Tooth Gems – LaserGlow Wax Tip Tool
Pro Tooth Gem Tools LaserGlow Wax Brush Applicator: Your Tooth Gem Precision Tool The LaserGlow Wax Brush Applicator helps tooth gem artists place crystals and charms with pinpoint accuracy, less slippage, and cleaner adhesive margins. Pair it with professional etch, bond, and LED curing for a fast, enamel-safe workflow. Table of Contents What Is a Wax Brush Applicator? Why Precision Matters in Tooth Gem Art Key Features of the LaserGlow Wax Brush Step-by-Step: How to Use a Wax Tip Applicator Pairing With Swarovski® Tooth Gems Complete Your Workflow: Etch • Bond • Glue • LED Disposable vs. Refillable Wax Pencils Pro Tips for Retention & Reviews FAQ What Is a Wax Brush Applicator for Tooth Gems? A wax brush applicator — sometimes called a wax tip tooth gem tool, rhinestone picker, or gem placement wand — is a single-use stick with a small, tacky wax tip designed to grab flat-back crystals, gold charms, opals, and CZ stones instantly. Instead of juggling tweezers or silicone tips, artists touch the wax tip to the face of the gem, lift it, and glide it into position on the enamel. The result is steadier control, especially with tiny stones and multi-gem designs. Why Precision Matters in Modern Tooth Gem Art Tooth gem demand is growing quickly, and many studios now offer advanced designs, clusters, and mixed-metals layouts. The biggest technical challenge remains gem slippage during placement: even a one-millimeter shift can throw off symmetry, disturb adhesive, or lead to early lift-off. Using a wax brush applicator helps you: Control tiny crystals better than metal tweezers or fingers. Protect bond strength by placing gems in a single, clean motion instead of sliding them through adhesive. Work faster on multi-gem layouts, shortening appointment time. Deliver camera-ready symmetry that clients love in photos and video. Key Features That Set the LaserGlow Wax Brush Apart Ultra-tacky wax tip Cosmetic-grade wax stays tacky at room and body temperature, making it easier to grab 1 mm crystals and heavier 3 mm charms without visible residue. Slim micro core The narrow tip keeps sight-lines clear so you can center gems accurately on canines, premolars, or incisal edges. Single-use, hygienic design Disposable applicators help maintain a fresh tip for every client and support good infection-control practices in your studio. Comfortable grip A slim, lightly textured handle is easy to control with gloved hands and reduces hand fatigue during detail work. Built for the LaserGlow system The applicator pairs naturally with the LaserGlow Tooth Gem Kit (Etch, Bond & Adhesive) and the LED Curing Light for a complete, pro-level workflow. Step-by-Step Tutorial: How to Use a Wax Tip Tooth Gem Applicator This overview is for trained tooth gem artists and dental professionals. Etching, bonding, and curing should only be performed by providers who understand enamel and adhesive protocols. Prep and etch the enamel Polish and clean the tooth surface. Apply etchant according to product instructions, then rinse and air-dry until the enamel looks lightly frosted. Apply bonding agent and light-cure Place a thin, even coat of bonding agent over the etched area and cure with your LED light for the recommended time. Load the gem onto the wax tip Touch the wax tip gently to the face of your chosen gem. The stone adheres instantly without sliding. Place the gem with precision Bring the gem to the tooth, guiding it into its exact position. The wax holds it steady so you can fine-tune alignment before curing. Flash-cure and release Light-cure briefly to lock the gem in place, then twist the applicator to break contact. Follow with a full cure to complete polymerization. Clean and review Wipe away any remaining adhesive or wax, check occlusion, and review aftercare instructions with your client. Pairing With Swarovski® Tooth Gems for Standout Shine A precision tool deserves premium crystals. LaserGlow offers Swarovski® Tooth Gems and other high-clarity crystals that catch and reflect light more intensely than generic stones. Combined with a wax brush applicator, you can position each gem exactly where it will sparkle most in photos and video. Complete Your Workflow: Etch • Bond • Adhesive • LED Curing The wax brush applicator is one piece of a bigger retention puzzle. For best results, use it inside a complete, compatible system: LaserGlow Tooth Gem Kit (Etch, Bond & Adhesive) A bundled kit with etchant, bonding agent, and gem adhesive designed specifically for tooth gems. View the Tooth Gem Kit → LaserGlow LED Curing Light A focused LED curing light that supports efficient polymerization and consistent results. See LED light specs → Disposable vs. Refillable Wax Pencils: The Hygiene Factor Refillable wax "crayons" might seem budget-friendly, but they can collect dust, lint, and bacteria over time. That buildup can reduce tackiness and undermine the clean, hygienic experience clients expect. Disposable wax brushes help you: Start each appointment with a fresh, uncontaminated tip. Support good infection-control practices in your studio. Maintain consistent tackiness from the first gem of the day to the last. Pro Tips to Boost Retention and Five-Star Reviews Use minimal adhesive. Excess adhesive can flood margins and weaken curing. Aim for a thin, controlled layer. Double-check occlusion. Have clients bite gently to ensure gems are not placed in heavy contact areas that experience strong chewing forces. Offer aftercare guidance. Provide simple written instructions and product suggestions so clients know how to brush, floss, and eat around their new gem. Document your work. Capture high-quality photos or short videos after each appointment to use in your portfolio and social media marketing. FAQ: LaserGlow Wax Brush Applicator How long do tooth gems last when used with this tool? With professional etch, bond, and curing, many artists see gems last several months or longer, depending on placement and client habits. Is the wax safe around the mouth? The wax tip is cosmetic-grade and designed to be wiped away easily after placement. Follow local hygiene guidelines and avoid leaving visible residue on the tooth. Is this tool for professionals only? The wax brush makes gem handling easier for everyone, but the bonding procedure itself should be completed by trained professionals or properly trained tooth gem artists to protect enamel. What gem sizes can it pick up? The tacky tip secures most popular tooth gem sizes, from very small crystals to medium charms. How do I remove residual wax? A quick wipe with a microbrush and appropriate cleanser (such as alcohol on the gem face only) is usually enough to remove any remaining wax. Final Thoughts: Upgrade Your Tooth Gem Toolkit The LaserGlow Wax Brush Applicator gives you more control, cleaner margins, and a smoother workflow for tooth gem placement. When you combine it with high-quality crystals, a dedicated tooth gem kit, and an LED curing light, you create a reliable system that helps gems look better and last longer. Explore the Professional Tooth Gem Wax Applicator to see how it can fit into your setup.
Learn more


