Teeth Whitening & Tooth Gem Blog | Expert Guides | LaserGlow

How Much Do Tooth Gems Cost? Pricing Guide
Single tooth gem placements cost $50–$150. Multi-gem designs, shaped gems, and custom layouts range from $150 to $500+. Here's what drives the price difference, how professional placement compares to DIY kits, and how much removal typically costs.
Learn more
Are Tooth Gems Safe for Your Teeth? What Pros Recommend
Tooth gems can be enamel-safe when applied with professional materials and removed correctly. The real risks come from low-quality adhesives and DIY removal. Here's what the myths get wrong and what professionals actually worry about.
Learn more
How Long Do Tooth Gems Last? Real Timelines & Tips
Most professionally applied tooth gems last 3–12 months. Here's what affects longevity, the habits that help or hurt retention, and how to get the most months out of your gem.
Learn more
Your Toothbrush Might Be Making You Sick – 5 Benefits of Using a UV Toothbrush & Razor Sanitizer
Bathroom Hygiene Upgrade UV Toothbrush & Razor Sanitizer: Why Your Daily Tools Need a Cleaner Routine Your toothbrush and razor live in one of the most humid rooms in your home. That means they can collect moisture, buildup, and germs between uses. A UV toothbrush and razor sanitizer helps support a cleaner bathroom routine by using UV light to sanitize the tools you use on your mouth and skin every day. Reviewed by David Hanna, RDH · Registered Dental Hygienist UV toothbrush sanitizer Dual slot toothbrush + razor design Cleaner oral care and shaving routine Shop UV Toothbrush & Razor Sanitizer Shop Oral Care Can Your Toothbrush and Razor Collect Germs? Yes. Toothbrushes and razors are exposed to moisture, skin cells, toothpaste residue, saliva, hair, bathroom humidity, and nearby surfaces. That does not mean you need to panic and throw your bathroom into the ocean, but it does mean your daily tools deserve better storage and cleaning habits. A toothbrush is meant to clean your teeth, but it is also used inside your mouth every day. A razor touches skin, hair, and sometimes tiny nicks or irritation. When these tools stay wet in a humid bathroom, they can become less fresh than anyone wants to think about before 8 AM. Quick answer: A UV toothbrush and razor sanitizer helps reduce germs on everyday hygiene tools by using UV light in a dedicated sanitizing chamber. It does not replace rinsing, drying, replacing old brushes or blades, or regular cleaning, but it adds a smarter hygiene step to your routine. Why Bathroom Storage Is the Problem Bathrooms are humid, warm, and frequently exposed to airborne particles from sinks, showers, toilets, towels, and shared surfaces. A wet toothbrush or razor left out in the open can stay damp for longer than expected, and damp tools are more likely to hold onto buildup. Common bathroom storage mistakes include: Leaving toothbrushes uncovered near the toilet. Storing multiple toothbrushes touching each other. Keeping razors in the shower where they stay wet. Using the same toothbrush after being sick without replacing or sanitizing it. Keeping old razor blades longer than recommended. Reality check: Your toothbrush and razor do not need to be sterile. They do need to be rinsed, dried, stored properly, replaced regularly, and sanitized when you want an extra hygiene step. Humans really did invent indoor plumbing and then stored toothbrushes next to toilets. Spectacular planning. How a UV Toothbrush & Razor Sanitizer Works A UV sanitizer uses ultraviolet light inside a closed device to help sanitize the surface of tools like toothbrush heads and razor blades. Instead of soaking your toothbrush in mouthwash, boiling it, or using harsh chemicals, UV sanitizing uses light during a timed cycle. The LaserGlow UV Toothbrush & Razor Sanitizer is designed with a dual-slot layout so you can sanitize both a toothbrush and razor in one compact bathroom device. Why UV is useful: UV sanitizing is chemical-free, easy to use, and helps support a cleaner routine for tools that touch your mouth and skin daily. 5 Benefits of Using a UV Toothbrush & Razor Sanitizer A UV sanitizer is not just a gadget that glows dramatically in your bathroom. It can support a cleaner, more organized, and more consistent hygiene routine. 1. Helps Reduce Germ Buildup UV light helps sanitize toothbrush and razor surfaces, reducing unwanted buildup between uses. 2. Supports Fresher Brushing A sanitized toothbrush can feel cleaner than a brush left damp in the open air. 3. Better Razor Hygiene Sanitizing your razor can help support a cleaner shaving routine, especially if you deal with irritation or bumps. 4. Chemical-Free Cleaning No boiling, no harsh disinfectants, and no messy soaking cups sitting on your counter like a tiny science failure. 5. Cleaner Bathroom Organization A dual-slot sanitizer gives your toothbrush and razor a dedicated place to live between uses. 6. Great for Shared Bathrooms Helpful for families, couples, dorm rooms, travel routines, and bathrooms where tools are stored close together. Why Razor Sanitizing Matters Too Most people think about toothbrush hygiene before razor hygiene, which is weird because razors literally scrape across your skin. Razors can hold moisture, hair, shaving cream residue, skin cells, and bacteria between uses. A cleaner razor routine may help reduce the chance of dragging old buildup across freshly shaved skin. If you are prone to razor bumps, irritation, ingrown hairs, or breakouts, keeping your razor cleaner is a simple upgrade. Rinse your razor after every shave. Shake off excess water and let it dry. Do not store it blade-down in standing water. Replace dull blades regularly. Use the UV sanitizer as an added hygiene step. How to Use the LaserGlow UV Toothbrush & Razor Sanitizer Using a UV sanitizer should be easy enough that you actually use it. The goal is not to add another annoying ritual to your life. Civilization already gave us enough of those. Rinse your toothbrush or razor after use. Shake off excess water. Place the toothbrush and/or razor into the sanitizer slots. Close the device. Run the UV cycle according to the product instructions. Let the tools stay stored in the device until your next use. Best practice: UV sanitizing works best when tools are rinsed first. The light is meant to sanitize surfaces, not magically erase toothpaste sludge, hair, or shaving cream because apparently physics still exists. What a UV Sanitizer Does and Does Not Do A UV sanitizer is a strong hygiene upgrade, but it is not a replacement for common sense. Use it as part of a complete routine. A UV sanitizer can help: Sanitize toothbrush heads and razor surfaces. Reduce germ buildup between uses. Give tools a cleaner storage space. Support fresh breath and shaving hygiene routines. Reduce the need for messy soaking methods. A UV sanitizer cannot: Guarantee you will not get sick. Replace toothbrush replacement every 3–4 months. Replace razor blade replacement. Fix gum disease, cavities, skin infections, or medical issues. Clean visible debris if you do not rinse your tools first. Who Should Use a UV Toothbrush & Razor Sanitizer? A UV sanitizer is useful for anyone who wants cleaner storage for daily hygiene tools. It is especially practical if your toothbrush or razor sits in a shared bathroom, small apartment, dorm, travel bag, or humid shower area. Families sharing one bathroom. Couples storing toothbrushes close together. People who want a cleaner fresh-breath routine. Anyone prone to razor irritation or bumps. Travelers who want cleaner storage. People who recently had a cold or illness and want better tool hygiene. Pair It with a Better Oral Care Routine Sanitizing your toothbrush is smart, but it works best when paired with a complete oral care routine. Use your UV sanitizer alongside brushing, flossing, tongue scraping, whitening maintenance, and regular dental checkups. Rose Gold Tongue Scraper Set for cleaner tongue care. Purple Toothpaste Color Corrector for visual yellow-tone correction. Teeth Whitening Strips for at-home whitening maintenance. LaserGlow Oral Care Collection for full routine upgrades. UV Toothbrush & Razor Sanitizer FAQ Do UV toothbrush sanitizers really work? UV toothbrush sanitizers use ultraviolet light to help sanitize toothbrush surfaces and reduce germ buildup. They should be used after rinsing the toothbrush and as part of a complete hygiene routine. Is UV light safe for toothbrushes and razors? UV sanitizers are designed to expose tools to UV light during short cycles inside a closed device. Always follow the product instructions and avoid looking directly at UV light. How often should I sanitize my toothbrush? Many people sanitize after each use or once daily. For best results, rinse your toothbrush first, shake off excess water, and place it inside the sanitizer. Can a UV sanitizer prevent illness? No device can guarantee illness prevention. A UV sanitizer can help reduce germs on toothbrushes and razors, but it should not replace handwashing, regular tool replacement, cleaning, or medical care when needed. Can I sanitize my razor too? Yes. A dual-slot UV toothbrush and razor sanitizer is designed to sanitize both a toothbrush and a razor, helping support a cleaner brushing and shaving routine. Do I still need to replace my toothbrush? Yes. UV sanitizing does not replace toothbrush replacement. Many dental professionals recommend replacing toothbrushes or brush heads every 3–4 months, or sooner if bristles are worn. Upgrade Your Bathroom Hygiene Routine The LaserGlow UV Toothbrush & Razor Sanitizer gives your toothbrush and razor a cleaner place to live between uses, helping support a fresher oral care and shaving routine. Shop UV Toothbrush & Razor Sanitizer Shop Oral Care Quick Benefits Why add a UV sanitizer to your bathroom? Helps sanitize toothbrushes Helps sanitize razors Chemical-free UV cleaning Cleaner storage between uses Great for shared bathrooms Supports fresher routines Recommended Products UV Toothbrush & Razor Sanitizer Rose Gold Tongue Scraper Set Purple Toothpaste Color Corrector All Oral Care Recommended Articles Tongue Scraping Benefits Benefits of Flossing Foods That Stain Teeth After Whitening Best Flavored Toothpaste
Learn moreHydrogen Peroxide vs Carbamide Peroxide: Pro Guide | LaserGlow
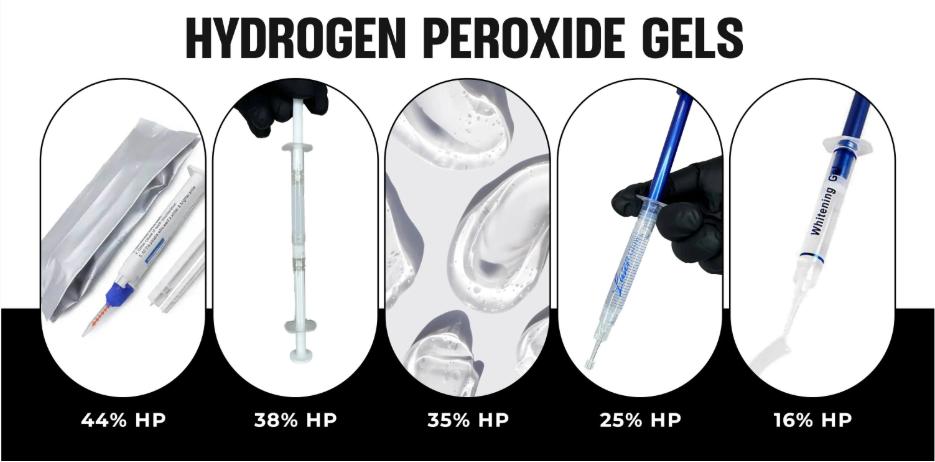
HP vs CP · Professional Whitening · Mechanism & Selection Hydrogen peroxide and carbamide peroxide are both used in professional whitening, but they work at different speeds and suit different treatment settings. Most providers use both — HP for in-office chairside treatment, CP for take-home maintenance. Here's the clinical rationale for that distinction and what professionals actually need to know about each. By David Hanna, RDH — Registered Dental Hygienist · Updated July 2026 Mechanism Speed & Setting Concentration Math Practice Use FAQ How They Work HP vs CP: How Each Agent Whitens Teeth Hydrogen Peroxide (HP) Hydrogen peroxide is the directly active whitening agent. When HP gel contacts the tooth surface, hydrogen peroxide molecules immediately begin penetrating enamel and dentin. Inside the tooth, H₂O₂ releases oxygen radicals that break apart the carbon double bonds in stain chromophores — the molecular structures responsible for tooth discoloration. The result is that stain molecules lose their color. HP works from first contact. Carbamide Peroxide (CP) Carbamide peroxide (also called urea peroxide) is a compound that breaks down into hydrogen peroxide and urea when it contacts moisture. The important number: roughly one-third of the carbamide peroxide concentration converts to active hydrogen peroxide. A 30% CP gel produces approximately 10% active HP. A 44% CP gel produces approximately 14–15% active HP. Because this conversion takes time, CP releases hydrogen peroxide more slowly and over a longer period than HP gel at equivalent concentrations. This makes CP's whitening effect more gradual — and its tolerability better for extended contact times. The key insight: CP is not weaker than HP — it's slower. At equivalent active-hydrogen-peroxide concentrations, both agents whiten similarly. The difference is delivery speed. HP delivers fast, CP delivers gradually. Speed & Treatment Setting HP for Chairside, CP for Home: Why the Setting Matters The speed difference between HP and CP maps directly to the best treatment setting for each: Factor Hydrogen Peroxide Carbamide Peroxide Active agent Directly H₂O₂ Converts to H₂O₂ over time Whitening onset Immediate from application Gradual — begins as conversion occurs Session length 30–60 minute chairside session Hours to overnight — designed for extended home use Best setting In-office chairside treatment Home tray whitening, take-home maintenance Sensitivity profile Moderate–High (concentration-dependent) Lower — gradual release is more tolerable for extended contact LaserGlow products HP Gels 16%–44% 44% CP Pen Concentration Math HP and CP Concentration Equivalents Because CP converts to HP at roughly a 3:1 ratio (CP:active HP), comparing concentrations requires translating between them. This matters when discussing equivalent whitening strength with clients or when reading product specifications. Carbamide Peroxide % Approximate Active HP Released Equivalent HP Gel Strength 10% CP ~3.3% HP Below professional HP range 16% CP ~5.3% HP Below professional HP range 22% CP ~7.3% HP Below 16% HP 35% CP ~11.7% HP Below 16% HP 44% CP ~14.7% HP Below 16% HP Why this matters: Even at 44% CP, the active HP concentration is lower than LaserGlow's lowest HP gel concentration (16% HP). This doesn't make 44% CP "weak" — it means CP is designed for extended contact time, not single-session burst whitening. The total whitening delivered over hours of home tray use can match or exceed what a shorter chairside HP session delivers. Practice Application How Professional Whitening Practices Use Both Professional whitening practices typically use HP and CP together in a two-phase approach, not as competing alternatives: Phase 1 — In-office HP session: Chairside whitening with 25%, 35%, or 44% HP gel. Full gingival barrier, LED activation, provider-supervised session. Fast visible results in a single appointment. Phase 2 — CP home maintenance: Client uses the 44% CP pen at home for maintenance whitening and event-based touch-ups. No provider supervision required for maintenance. This approach gives clients the best of both: immediate results from the in-office HP session, and a practical home option for maintaining shade without repeating the full chairside service for every touch-up. Chairside HP25% HP GelMost popular in-office strength. 1.2 mL syringe, 2–3 clients. Advanced HP35% HP GelFor stubborn staining. Gingival barrier required. Max HP44% HP Dual-BarrelMaximum strength. Complex cases. 5 mL dual-barrel. Home CP44% CP PenClient home maintenance and touch-up between sessions. FAQ HP vs CP Whitening FAQ Which is better for professional whitening — hydrogen peroxide or carbamide peroxide? HP is better for in-office chairside whitening because it's directly active and delivers fast results in a single session. CP is better for home maintenance whitening because its gradual release suits extended contact times and is more tolerable for hours-long home tray use. Professional practices typically use both — HP for in-office treatment, CP for take-home follow-up. The question isn't which is "better" overall; it's which is better for the specific treatment setting. Is 44% carbamide peroxide the same as 44% hydrogen peroxide? No — they are significantly different in whitening strength. 44% CP releases approximately 14–15% active HP as it breaks down. LaserGlow's 44% HP gel delivers 44% active hydrogen peroxide directly from application. The CP percentage refers to the carbamide compound concentration, not the active HP concentration. Compare them by active HP content, not by the number on the label. Can clients whiten at home with carbamide peroxide after an in-office HP treatment? Yes — this is the standard two-phase professional whitening approach. The in-office HP session delivers immediate results; the client continues with a CP take-home product (like the 44% CP pen) to maintain shade between professional visits. There's no required waiting period between the in-office HP session and starting CP home maintenance, as long as there's no significant sensitivity from the in-office appointment. Why does carbamide peroxide cause less sensitivity than hydrogen peroxide? CP's gradual hydrogen peroxide release is the main reason. Sensitivity during whitening is associated with the concentration and speed of HP penetrating enamel and dentin. Because CP converts to HP gradually, the active HP concentration in contact with dental tissue at any given moment is lower than with a direct HP gel of equivalent concentration labeling — which reduces the intensity of the sensitivity response. Do carbamide peroxide gels require gingival barrier? Home-use CP products like pens and take-home trays don't typically use gingival barrier because they're designed for self-application with lower active HP concentrations and extended contact times. Professional CP gels used in-office under provider supervision follow the same barrier protocol as HP gels at equivalent active-HP concentrations. For the LaserGlow 44% CP pen used at home, barrier is not required as part of standard home maintenance use. Related Resources HP vs CP vs PAP Master HP vs PAP Deep Dive All HP Gels HP Strength Guide 44% CP Pen Guide Shop All Gels
Learn more
How to Choose Professional Whitening Gel Strength | LaserGlow
Not sure which teeth whitening gel strength to choose? This guide breaks down the differences between 16%, 25%, 35%, and 44% hydrogen peroxide gels—explaining which is best for sensitive teeth, which delivers the fastest results, and how to safely use each with LED/laser systems. Perfect for dentists, estheticians, and whitening technicians, it’s your go-to resource for matching gel strength to client needs while ensuring safe, comfortable, and dazzling results.
Learn more
Can You Whiten Veneers? How to Remove Stains from Porcelain & Composite Veneers
Veneer Whitening & Maintenance Guide Can You Whiten Veneers? How to Remove Stains and Keep Veneers Bright Porcelain and composite veneers do not whiten the same way natural teeth do. Whitening gel cannot bleach the veneer material itself, but stains around veneer edges, natural teeth nearby, and surface buildup can often be improved with the right professional care and daily maintenance. Reviewed by David Hanna, RDH · Registered Dental Hygienist Porcelain veneers Composite veneers Veneer stain removal 20-minute veneer touch-up Book Veneer Whitening in Clifton Book Veneer Whitening in Edgewater Can You Whiten Veneers? No, you cannot whiten the porcelain or composite veneer material itself with traditional teeth whitening products. Whitening gels, strips, and LED kits are designed to whiten natural tooth enamel. Veneers are artificial restorations, so peroxide whitening gel does not penetrate or change their actual shade. That does not mean your veneer smile is stuck looking dull forever. In many cases, what people call “yellow veneers” is really staining around the veneer margins, dull surface buildup, discoloration on nearby natural teeth, or aging bonding material. Those issues can often be improved without replacing the veneers. Quick answer: Veneers cannot be bleached whiter than their original shade, but the appearance of veneers can often be refreshed by polishing the surface, cleaning the margins, removing stains around the edges, and whitening nearby natural teeth when appropriate. Why Veneers Can Look Yellow or Dull Over Time Porcelain veneers are stain-resistant, but they are not maintenance-free. Composite veneers are more likely to stain because composite resin is more porous than porcelain. Even if the veneer itself does not deeply yellow, the overall smile can look darker for several reasons. Stains at the Margins Coffee, tea, red wine, curry, berries, tobacco, and dark sauces can collect where the veneer meets the tooth. Aging Bonding Material The cement or resin around the veneer can discolor over time, especially near the gumline. Natural Tooth Color Changes Nearby natural teeth can darken or whiten differently, making veneers appear mismatched. Surface Wear or Dullness A worn or roughened surface can collect stains more easily and lose that fresh polished look. Important: If your veneers look darker, the first step is figuring out whether the issue is surface staining, margin staining, natural tooth color, gum recession, bonding discoloration, or veneer age. Guessing is how people end up buying three whitening kits that do absolutely nothing for porcelain. Humanity’s little shopping treadmill continues. How to Safely Remove Stains from Veneers Since veneers cannot be bleached like natural enamel, the safest approach is to clean, polish, and maintain them properly. The right solution depends on where the discoloration is coming from. 1. Professional Dental Cleaning A dentist or hygienist can clean around the veneer margins, polish the surfaces, remove plaque buildup, and check whether the veneer bonds are healthy. This is usually the first step if veneers look dull. 2. Cosmetic Veneer Polishing If surface dullness is the issue, a dental professional may polish porcelain or composite veneers using appropriate tools and materials. This can help restore shine without changing the veneer’s original shade. 3. Gentle Daily Products Use a non-abrasive toothpaste and a soft toothbrush. Avoid charcoal, baking soda scrubs, lemon juice, apple cider vinegar, or harsh DIY stain removers. Those can scratch the veneer surface or irritate the tooth and gums around it. Naturally, the internet will suggest them anyway, because chaos has Wi-Fi. 4. Targeted Veneer Margin Touch-Up Some veneer smiles benefit from a targeted in-office stain-lifting treatment around the veneer edges. This does not whiten the porcelain itself. Instead, it focuses on stains near the margins and nearby natural tooth structure so the smile looks cleaner and brighter. 5. Veneer Replacement If a veneer is old, cracked, internally discolored, poorly matched, or has lost its surface finish, replacement may be the only way to make it truly brighter. This is usually the last option, not the first. LaserGlow Veneer Whitening: A 20-Minute Veneer Touch-Up LaserGlow offers a specialized veneer whitening touch-up for clients who want to refresh the appearance of veneers without expecting the veneer material itself to bleach. The treatment is designed to target staining around the veneer margins and brighten the surrounding smile area. This is different from a full teeth whitening treatment. A full whitening session targets natural enamel. A veneer touch-up focuses on the stain-prone areas around veneers, especially where pigment can collect near the edges. Clear expectation: Veneer whitening does not change the original porcelain or composite shade. It helps improve the appearance of staining around veneers, margin discoloration, and nearby natural tooth contrast. Available LaserGlow veneer whitening locations Veneer Whitening in Clifton, NJ Veneer Whitening in Edgewater, NJ Veneer Teeth Whitening in Miami, FL Book Clifton Veneer Whitening Book Miami Veneer Whitening How to Keep Veneers White and Bright The best way to keep veneers looking bright is prevention. Veneer maintenance is less dramatic than replacing veneers later, which is nice because dental bills are already committed to being theatrical. Brush twice daily with a soft toothbrush. Floss daily to reduce plaque and staining around veneer edges. Use non-abrasive toothpaste. Avoid charcoal toothpaste, baking soda scrubs, lemon juice, and vinegar-based DIY whitening. Limit coffee, tea, red wine, curry, berries, soy sauce, and tobacco. Rinse with water after stain-heavy foods and drinks. Schedule regular dental cleanings and veneer checks. Use a water flosser if recommended by your dental provider. For stain prevention tips, read our guide on foods that stain teeth after whitening. Can Purple Toothpaste Help Veneers Look Brighter? Purple toothpaste does not whiten veneers or bleach enamel. It works as a temporary color-correcting product that can visually reduce the look of yellow tones on the smile surface. This can be useful before photos, events, or between veneer maintenance visits. Since purple toothpaste is not a peroxide bleach, it is better described as a cosmetic brightening product rather than a veneer whitening treatment. It can help the smile appear brighter, but it will not fix deep staining, old veneers, or discolored bonding. Shop Purple Toothpaste Shop Oral Care Can You Use Whitening Strips or LED Kits on Veneers? Whitening strips and LED kits can whiten natural teeth, but they do not change the shade of veneers. If you have a mix of veneers and natural teeth, whitening your natural teeth may make the veneers look darker by comparison if the shades no longer match. If you have veneers only on some teeth, speak with a dental professional before whitening the surrounding natural teeth. Shade planning matters, unless your goal is “accidental two-tone smile,” which, mercifully, is not trending yet. Can You Whiten Veneers FAQ Can you whiten veneers? No. You cannot bleach porcelain or composite veneers whiter with standard whitening gels, strips, or LED kits. However, you can often improve the appearance of veneers by removing surface stains, cleaning the margins, polishing the veneer surface, or refreshing the surrounding natural teeth. Why do veneers look yellow over time? Veneers may look yellow because of stains at the margins, aging bonding material, discoloration on nearby natural teeth, gum recession, surface dullness, or older composite resin material. Do whitening strips work on veneers? No. Whitening strips do not change the color of veneers. They are made to whiten natural enamel, not porcelain, composite, crowns, fillings, bonding, or other restorations. Can purple toothpaste whiten veneers? No. Purple toothpaste does not bleach veneers. It may temporarily improve the visual brightness of a smile by color-correcting yellow tones, but it does not change the veneer material. How can I remove stains from veneers? The safest options are professional dental cleaning, veneer polishing, non-abrasive home care, and targeted in-office veneer margin stain-lifting. Avoid abrasive DIY methods like charcoal, baking soda, lemon juice, or vinegar. Do composite veneers stain more than porcelain veneers? Yes. Composite resin veneers are generally more prone to staining and dullness than porcelain veneers because composite is more porous and less stain-resistant. When should veneers be replaced? Veneers may need replacement if they are cracked, deeply discolored, poorly matched, worn, leaking at the margins, or older and no longer responding to polishing or maintenance. Where does LaserGlow offer veneer whitening? LaserGlow offers veneer whitening touch-ups in Clifton, NJ, Edgewater, NJ, and Miami, FL. The treatment focuses on improving stains around veneer margins and surrounding tooth structure, not bleaching the veneer material itself. Refresh the Look of Your Veneer Smile Veneers cannot be bleached whiter, but the stains around them can often be improved. Book a LaserGlow veneer whitening touch-up in Clifton, Edgewater, or Miami for a cleaner, brighter-looking smile. Book Clifton Book Edgewater Quick Truth Veneers do not whiten like natural teeth. The goal is to clean, polish, and lift stains around the margins so the overall smile looks brighter. Porcelain does not bleach Composite can stain faster Margins can collect pigment Professional polishing helps Old veneers may need replacement Veneer Whitening Locations Clifton, NJ Veneer Whitening Edgewater, NJ Veneer Whitening Miami, FL Veneer Whitening Contact LaserGlow Recommended Products Purple Toothpaste Color Corrector Rose Gold Tongue Scraper Set UV Toothbrush & Razor Sanitizer All Oral Care Recommended Articles Foods That Stain Teeth After Whitening Whitening Toothpaste vs Professional Whitening Teeth Whitening Strips Review Blue LED Teeth Whitening Guide
Learn more
LaserGlow 44% Hydrogen Peroxide Whitening Gel Recognized as Amazon’s Overall Pick
Professional Whitening Gel Recognition LaserGlow 44% Hydrogen Peroxide Whitening Gel Recognized as Amazon’s Overall Pick LaserGlow’s 44% Hydrogen Peroxide Dual-Barrel Whitening Gel has been shown as Amazon’s Overall Pick for hydrogen peroxide whitening gel, giving professionals another trust signal when choosing a powerful chairside whitening formula for dental offices, whitening studios, med-spas, salons, and aesthetic clinics. Reviewed by: David Hanna, RDH · Updated: February 16, 2026 Shop 44% HP Whitening Gel View Professional Whitening Gels This product is intended for trained professional use. Gingival barrier and proper whitening protocols are required when using high-strength hydrogen peroxide gels. What Amazon’s Overall Pick Recognition Means When a professional whitening product is displayed as Amazon’s Overall Pick, it gives shoppers a visible trust signal on the marketplace. For LaserGlow, that recognition supports what professionals already look for in a whitening gel: strong performance, clear product positioning, customer demand, and a formula built for professional-grade whitening sessions. We are not going to pretend this badge magically means Amazon wrote a love letter to peroxide chemistry. It does mean LaserGlow is being visibly highlighted in a competitive category, which matters when buyers are comparing hydrogen peroxide whitening gels online. Why Professionals Choose LaserGlow 44% HP Whitening Gel 44% Hydrogen Peroxide Strength A high-strength professional whitening gel designed for trained whitening providers using proper isolation and protocols. Dual-Barrel Syringe System The dual-barrel format keeps components separated until application, helping support freshness and controlled delivery. Built for Chairside Whitening Ideal for dental offices, whitening studios, med-spas, salons, and cosmetic treatment providers. Professional-Use Positioning Designed for trained users who understand gingival protection, enamel safety, timing, and client screening. The Fast Answer: Who Is This Gel For? LaserGlow 44% Hydrogen Peroxide Whitening Gel is for trained professionals who need a high-strength whitening gel for chairside treatments. It is not a casual at-home whitening toothpaste, strip, or pen. This is a professional whitening supply that should be used with gingival barrier, proper client evaluation, and controlled application timing. If you are a dental professional, whitening technician, med-spa provider, salon owner, or aesthetic clinic offering teeth whitening services, this product belongs in your professional whitening lineup. What Makes the Dual-Barrel Whitening Gel Different? Dual-barrel syringe technology separates formula components until use. For professional whitening providers, that format helps support a cleaner workflow and more controlled chairside application compared with basic single-chamber packaging. LaserGlow’s 44% HP Dual-Barrel Whitening Gel is built for providers who want strong whitening performance while maintaining a professional treatment setup. 44% Hydrogen Peroxide Whitening Gel: What It Does Hydrogen peroxide is one of the most widely used active ingredients in professional teeth whitening. It helps break down stain molecules that contribute to discoloration from coffee, tea, red wine, tobacco, aging, and everyday staining. At 44%, this is a powerful professional-strength formula. That strength is exactly why proper use matters. Stronger gel does not mean “use it casually and hope for the best.” It means trained providers need to follow whitening protocols carefully, because apparently safety still matters. Wild concept. Professional Safety Requirements LaserGlow 44% Hydrogen Peroxide Whitening Gel should be used only by trained professionals. A gingival barrier is required to protect soft tissue during treatment. Providers should also screen clients for sensitivity, restorations, pregnancy status, oral health concerns, active decay, gum irritation, and other contraindications before whitening. High-strength whitening gels can deliver impressive results, but they must be handled correctly. Proper isolation, timing, client instructions, and post-treatment care are not optional little decorations. They are the difference between a professional service and chaos with a syringe. LaserGlow 44% HP Gel vs Other Whitening Gels Feature LaserGlow 44% HP Dual-Barrel Gel Lower-Strength Whitening Gels Consumer Whitening Products Primary user Trained whitening professionals Professionals or supervised users depending on strength Consumers Active ingredient Hydrogen peroxide Hydrogen peroxide or carbamide peroxide Usually lower peroxide, PAP, or non-peroxide formats Strength 44% HP Varies by formula Lower-strength formulas Best use Chairside professional whitening sessions Maintenance, chairside, or controlled protocols At-home whitening maintenance Gingival barrier required Yes Often required depending on concentration Usually no, depending on product Why This Recognition Matters for Professionals Professionals do not choose whitening supplies based on pretty packaging alone, though humanity keeps trying. They need reliable strength, clear usage expectations, client-visible results, and a product that supports a premium treatment experience. Being shown as Amazon’s Overall Pick helps reinforce LaserGlow’s visibility in the professional whitening gel market. It also gives clinics, whitening studios, and med-spas an easier trust signal when comparing products for their treatment menu. Best Use Cases for LaserGlow 44% HP Whitening Gel In-Office Whitening Sessions For providers offering chairside whitening treatments with proper tissue isolation. Med-Spa Whitening Services For aesthetic practices adding professional smile-brightening treatments. Whitening Technician Studios For trained whitening providers who need high-strength gel for service-based treatments. Salon & Spa Add-On Services For trained professionals offering cosmetic whitening as a premium appointment upgrade. Where to Buy LaserGlow 44% Hydrogen Peroxide Whitening Gel You can purchase LaserGlow 44% Hydrogen Peroxide Dual-Barrel Whitening Gel directly from the official LaserGlow website. Buying direct gives professionals access to product information, support, and additional whitening supplies such as gingival barrier, LED curing lights, whitening machines, and treatment accessories. Shop here: LaserGlow 44% Hydrogen Peroxide Teeth Whitening Gel Professionals interested in bulk pricing can also explore LaserGlow’s wholesale whitening supplies for clinics, salons, med-spas, and whitening studios. FAQs What does Amazon’s Overall Pick mean for LaserGlow 44% Whitening Gel? It means the product has been visibly highlighted on Amazon in the hydrogen peroxide whitening gel category. For shoppers and professionals, that creates an additional trust signal when comparing professional whitening gel options. Is LaserGlow 44% Hydrogen Peroxide Whitening Gel for professional use? Yes. LaserGlow 44% Hydrogen Peroxide Whitening Gel is intended for trained professional use. Gingival barrier and proper whitening protocols are required. Do I need gingival barrier with 44% hydrogen peroxide gel? Yes. Gingival barrier is required when using high-strength hydrogen peroxide whitening gel to protect the gums and soft tissue during application. Can consumers use 44% hydrogen peroxide whitening gel at home? This gel is designed for trained professionals. Consumers should not use high-strength hydrogen peroxide whitening gels without proper training, isolation, and safety protocols. What makes dual-barrel whitening gel different? A dual-barrel syringe keeps formula components separated until application, helping support freshness, controlled delivery, and professional chairside workflow.
Learn moreHow to Get Rid of Bad Breath Permanently – Expert Halitosis Guide
Fresh Breath Guide How to Get Rid of Bad Breath Permanently: Causes, Routine & Products That Help To get rid of bad breath long-term, you need to target the real cause instead of only covering it with mints. For most people, that means cleaning the tongue, flossing daily, staying hydrated, using alcohol-free oral care, and keeping a fresh breath product nearby for on-the-go support. Reviewed by David Hanna, RDH · Registered Dental Hygienist Bad breath causes Probiotic breath spray Tongue bacteria Dry mouth support Shop Probiotic Mouth Spray Shop Tongue Scraper Set Quick Answer: How Do You Get Rid of Bad Breath Permanently? The best way to get rid of bad breath long-term is to find and treat the cause. For most people, bad breath comes from odor-causing bacteria on the tongue, between teeth, around the gums, or in a dry mouth. A consistent routine can dramatically improve breath, but chronic odor may need dental or medical treatment. Quick answer: Brush twice daily, floss once daily, clean your tongue, use alcohol-free mouthwash, stay hydrated, use a breath spray for on-the-go freshness, and treat cavities, gum disease, dry mouth, sinus issues, reflux, or tonsil stones if they are part of the problem. Featured Product: LaserGlow Probiotic Mouth Spray LaserGlow Probiotic Mouth Spray is the easiest fresh-breath support product to keep in your bag, car, desk, or bathroom. Use it between brushing sessions when you want quick breath refreshment without relying on sugary mints or gum. Shop Probiotic Mouth Spray Pair with HA5 Mouthwash “Permanent” does not mean you spray once and retire from oral hygiene like a tiny mint-scented emperor. It means you remove the source of odor, keep the habits that stop it from coming back, and use fresh-breath products to support the routine throughout the day. Why Does My Breath Still Smell After Brushing? Brushing is important, but it does not clean every odor source in your mouth. Bad breath can continue after brushing if bacteria are sitting on the tongue, between teeth, under the gumline, around dental work, or in a dry mouth. Common reasons breath still smells after brushing Tongue coating: The back of the tongue can trap bacteria, food debris, and odor-producing compounds. Skipping floss: Food and plaque between teeth can smell even if the front surfaces are brushed. Dry mouth: Low saliva allows bacteria and odor to build up faster. Gum disease: Deep gum pockets can trap bacteria that brushing cannot reach. Cavities or infections: Tooth decay, abscesses, and infected tissue can create persistent odor. Diet and habits: Garlic, onions, coffee, alcohol, smoking, and vaping can all contribute. Sinus, tonsil, or reflux issues: Sometimes the odor source is not just the teeth. Important: If your breath smells bad every day despite brushing, do not just upgrade to stronger gum. That is like spraying cologne on a trash can. Find the source, then use breath spray as support, not as your entire personality. Where Probiotic Mouth Spray Fits Into a Bad Breath Routine Breath spray is not a replacement for brushing, flossing, tongue cleaning, or dental treatment. But it is one of the most practical products for keeping breath fresher between full oral care routines. LaserGlow Probiotic Mouth Spray is ideal after coffee, meals, travel, work meetings, dates, workouts, or any moment when you want a quick breath refresh without chewing gum or sucking on sugary mints. Use probiotic mouth spray when: You are between brushing sessions. You just had coffee, lunch, or a strong-smelling meal. Your mouth feels stale during the day. You need a quick refresh before speaking closely with someone. You want an easy product to carry in your bag, desk, car, or travel kit. Best use: Spray for fast freshness, then keep the full routine: brush, floss, tongue scrape, hydrate, and use mouthwash. The spray is your daily backup, not a magical fairy with dental credentials. Shop LaserGlow Probiotic Mouth Spray Top Causes of Bad Breath Bad breath, also called halitosis, usually starts in the mouth. But if oral hygiene is already strong and the odor continues, other causes may need attention. Tongue Bacteria The tongue’s textured surface can trap bacteria and sulfur odors, especially near the back. Dry Mouth Low saliva can make breath worse because saliva helps rinse away bacteria and food debris. Gum Disease Inflamed gums and periodontal pockets can hold odor-causing bacteria below the gumline. Cavities or Infection Decay, abscesses, and untreated dental issues can create persistent foul odor. Diet and Tobacco Garlic, onions, coffee, alcohol, smoking, and vaping can leave lingering odor. Sinus, Tonsils, or GERD Postnasal drip, tonsil stones, and reflux can cause odor that brushing does not fix. Best Daily Routine to Get Rid of Bad Breath The best fresh-breath routine is simple, but it has to be complete. Teeth, gums, tongue, saliva, and daily habits all matter. Convenient, because apparently the mouth decided to be a whole ecosystem. Morning: Brush for 2 Minutes Use a daily toothpaste and brush the gumline, chewing surfaces, and tongue gently. Do not rush the back teeth. Floss Once Daily Floss removes odor-causing debris between teeth that brushing cannot reach. Clean Your Tongue Use a tongue scraper or gently brush the tongue from back to front to remove coating and odor-causing buildup. Use Alcohol-Free Mouthwash Choose an alcohol-free rinse that freshens breath without drying out your mouth. Use Probiotic Mouth Spray During the Day Keep LaserGlow Probiotic Mouth Spray nearby for quick freshness after meals, coffee, travel, or before close conversations. Hydrate Often Sip water, especially after coffee, meals, and workouts, to support saliva flow and rinse away odor triggers. Clean or Replace Oral Tools Replace toothbrushes regularly and keep brushes, retainers, mouthguards, and tongue scrapers clean. Best LaserGlow Products for Bad Breath Support Products cannot fix every cause of bad breath, but the right tools can support the daily habits that keep breath fresher. Probiotic Mouth Spray LaserGlow Probiotic Mouth Spray is the main on-the-go fresh breath product for quick daily refreshment between brushing sessions. HA5 Hydrating Mouthwash LaserGlow HA5 Hydrating Mouthwash is an alcohol-free rinse designed to support fresh breath and dry-mouth-friendly hydration. Rose Gold Tongue Scraper Set LaserGlow Tongue Scraper Set helps remove tongue coating, one of the most common sources of mouth odor. Day & Night Whitening Toothpaste LaserGlow Day & Night Toothpaste supports daily brushing, stain maintenance, and a fresher oral care routine. UV Toothbrush & Razor Sanitizer LaserGlow UV Toothbrush & Razor Sanitizer gives your toothbrush a cleaner storage routine between uses. Complete Oral Care Routine Shop LaserGlow Oral Care to build a full fresh breath routine instead of relying on one lonely product to carry civilization. Best fresh breath combo: Probiotic Mouth Spray + tongue scraper + alcohol-free mouthwash + daily brushing + flossing. The spray gives quick freshness, while the routine handles the actual causes. How Tongue Scraping Helps Bad Breath The tongue is one of the biggest hiding places for odor-causing bacteria. If you notice a white, yellow, or coated film on your tongue, that buildup may be contributing to bad breath. A tongue scraper helps remove that coating more directly than brushing alone. Use light pressure, scrape from back to front, rinse the scraper after each pass, and stop if you feel discomfort. Shop Rose Gold Tongue Scraper Set Read Tongue Scraping Benefits How Dry Mouth Causes Bad Breath Saliva helps rinse the mouth naturally. When your mouth is dry, bacteria and odor can build up faster. Dry mouth can be caused by mouth breathing, dehydration, caffeine, alcohol, tobacco, certain medications, and some medical conditions. Dry mouth tips for fresher breath Drink water throughout the day. Use an alcohol-free mouthwash. Use mouth spray when your mouth feels stale between brushing sessions. Avoid smoking and vaping. Limit alcohol and excessive caffeine. Chew sugar-free gum if it helps stimulate saliva. Speak with a dentist or doctor if dry mouth is persistent. Shop Probiotic Mouth Spray Shop HA5 Hydrating Mouthwash What to Avoid If You Want Fresher Breath Some habits make bad breath worse even when you brush daily. If your breath keeps coming back, look at what is happening between brushing sessions. Skipping flossing. Ignoring tongue coating. Using alcohol-heavy mouthwash if your mouth is already dry. Smoking, vaping, or chewing tobacco. Drinking coffee all day without rinsing with water. Leaving retainers, dentures, or mouthguards uncleaned. Ignoring bleeding gums, tooth pain, or cavities. Masking odor with sugary mints instead of treating the cause. When to See a Dentist or Doctor for Bad Breath If bad breath does not improve after improving brushing, flossing, tongue cleaning, hydration, mouthwash habits, and daily breath spray use, it is time to check for deeper causes. See a dentist if you have: Bleeding gums. Swollen or tender gums. Loose teeth. Tooth pain or sensitivity. Visible cavities or broken teeth. Bad breath that smells rotten or metallic. See a doctor or ENT if you suspect: Chronic sinus infections or postnasal drip. Tonsil stones. Acid reflux or GERD. Persistent dry mouth from medication or health conditions. Unusual breath odor with other symptoms. Do not ignore persistent odor: Bad breath is often simple, but sometimes it is a sign of gum disease, infection, reflux, or another health issue. Mouth spray helps with freshness, but it cannot solve what needs treatment. Fresh Breath FAQ How do I get rid of bad breath permanently? To get rid of bad breath long-term, identify the cause and treat it. For most people, this means brushing twice daily, flossing, cleaning the tongue, using alcohol-free mouthwash, staying hydrated, using breath spray for on-the-go freshness, and treating cavities, gum disease, dry mouth, or sinus issues when present. Does probiotic mouth spray help bad breath? Probiotic mouth spray can support fresher breath between brushing sessions and is useful after meals, coffee, travel, or before close conversations. It should be used as part of a full oral care routine, not as a replacement for brushing, flossing, or dental care. Why does my breath still smell after brushing? Your breath may still smell after brushing if bacteria remain on your tongue, between teeth, under the gums, or in dental appliances. Dry mouth, tonsil stones, sinus issues, reflux, smoking, and diet can also cause odor after brushing. What is the best mouth spray for bad breath? The best mouth spray for bad breath should be easy to carry, quick to use, and designed for fresh breath support between brushing sessions. LaserGlow Probiotic Mouth Spray is designed for daily on-the-go breath refreshment. What is the best mouthwash for bad breath? The best mouthwash for bad breath is usually alcohol-free and designed to freshen breath without drying the mouth. If dry mouth is part of the problem, a hydrating mouthwash like LaserGlow HA5 Hydrating Mouthwash can support a fresher routine. Does tongue scraping help bad breath? Yes. Tongue scraping can help reduce odor by removing coating, bacteria, and debris from the tongue surface, especially near the back of the tongue where odor often collects. Can dry mouth cause bad breath? Yes. Dry mouth can make bad breath worse because saliva helps rinse away food particles and bacteria. Hydration, alcohol-free mouthwash, mouth spray, and treating the cause of dry mouth can help. When should I worry about bad breath? See a dentist or doctor if bad breath is persistent, worsening, or paired with bleeding gums, tooth pain, swelling, sinus symptoms, reflux, tonsil stones, or unusual breath odor. Fresh Breath Starts with the Right Routine Use LaserGlow Probiotic Mouth Spray for on-the-go freshness, then support it with tongue scraping, alcohol-free mouthwash, daily brushing, flossing, hydration, and regular dental care. Shop Probiotic Mouth Spray Shop Tongue Scraper Main Product Keep LaserGlow Probiotic Mouth Spray nearby for quick fresh breath support throughout the day. Shop Probiotic Mouth Spray Fresh Breath Checklist Do these daily for better breath. Brush twice daily Floss once daily Clean your tongue Use mouth spray during the day Use alcohol-free mouthwash Drink water often See a dentist if odor persists Recommended Products Probiotic Mouth Spray HA5 Hydrating Mouthwash Rose Gold Tongue Scraper Set Day & Night Whitening Toothpaste UV Toothbrush & Razor Sanitizer All Oral Care Recommended Articles Tongue Scraping Benefits Benefits of Flossing UV Toothbrush Sanitizer Benefits Best Flavored Toothpaste
Learn more